It’s finally here! I’m excited to share with you our master bedroom reveal. We put so much time and energy into creating a restorative bedroom we love. Participating in this One Room Challenge was rewarding because I learned so much from my first challenge last Fall. Every home project runs into problems along the way – and I’m saying that as someone who does this for a living! It really is that unpredictable. I’m so proud of what we accomplished and how absolutely transformative the final result has been. We FEEL different when we’re in the bedroom now. It helps us set the tone for each day when we get up and each night when we go to bed. Words just can’t describe how lovely it has been to live in the finished space. So keep reading to see every charming part of this bedroom makeover!
If you clicked through from the ORC site, howdy! I’m Shaun Crha (sir-ha), an interior designer in Long Beach, CA. You can see my previous One Room Challenge renovation here. My husband, Sean, and I are currently renovating our 1930 Spanish bungalow – the Crhacienda. Get it? Because my last name is Crha! 🙄🤣 We’ve already finished the following spaces: our dining room, laundry room, front garden, and a completely new guest house (the Casita). Thank you for joining us as we tackle our master bedroom makeover! If you’re trying to catch up on everything be sure to visit my Week 1 post (before pictures, inspiration, and moodboard), Week 2 (design plan, progress, design concept), Week 3 (the master closet plans, trim paint progress, the great dresser debate), Week 4 (master closet progress, wallpaper, marble dresser top, custom window), Week 5 + 6 (lime wash paint, lighting, details), Week 7 (window treatments, more details).
BEDROOM BEFORE
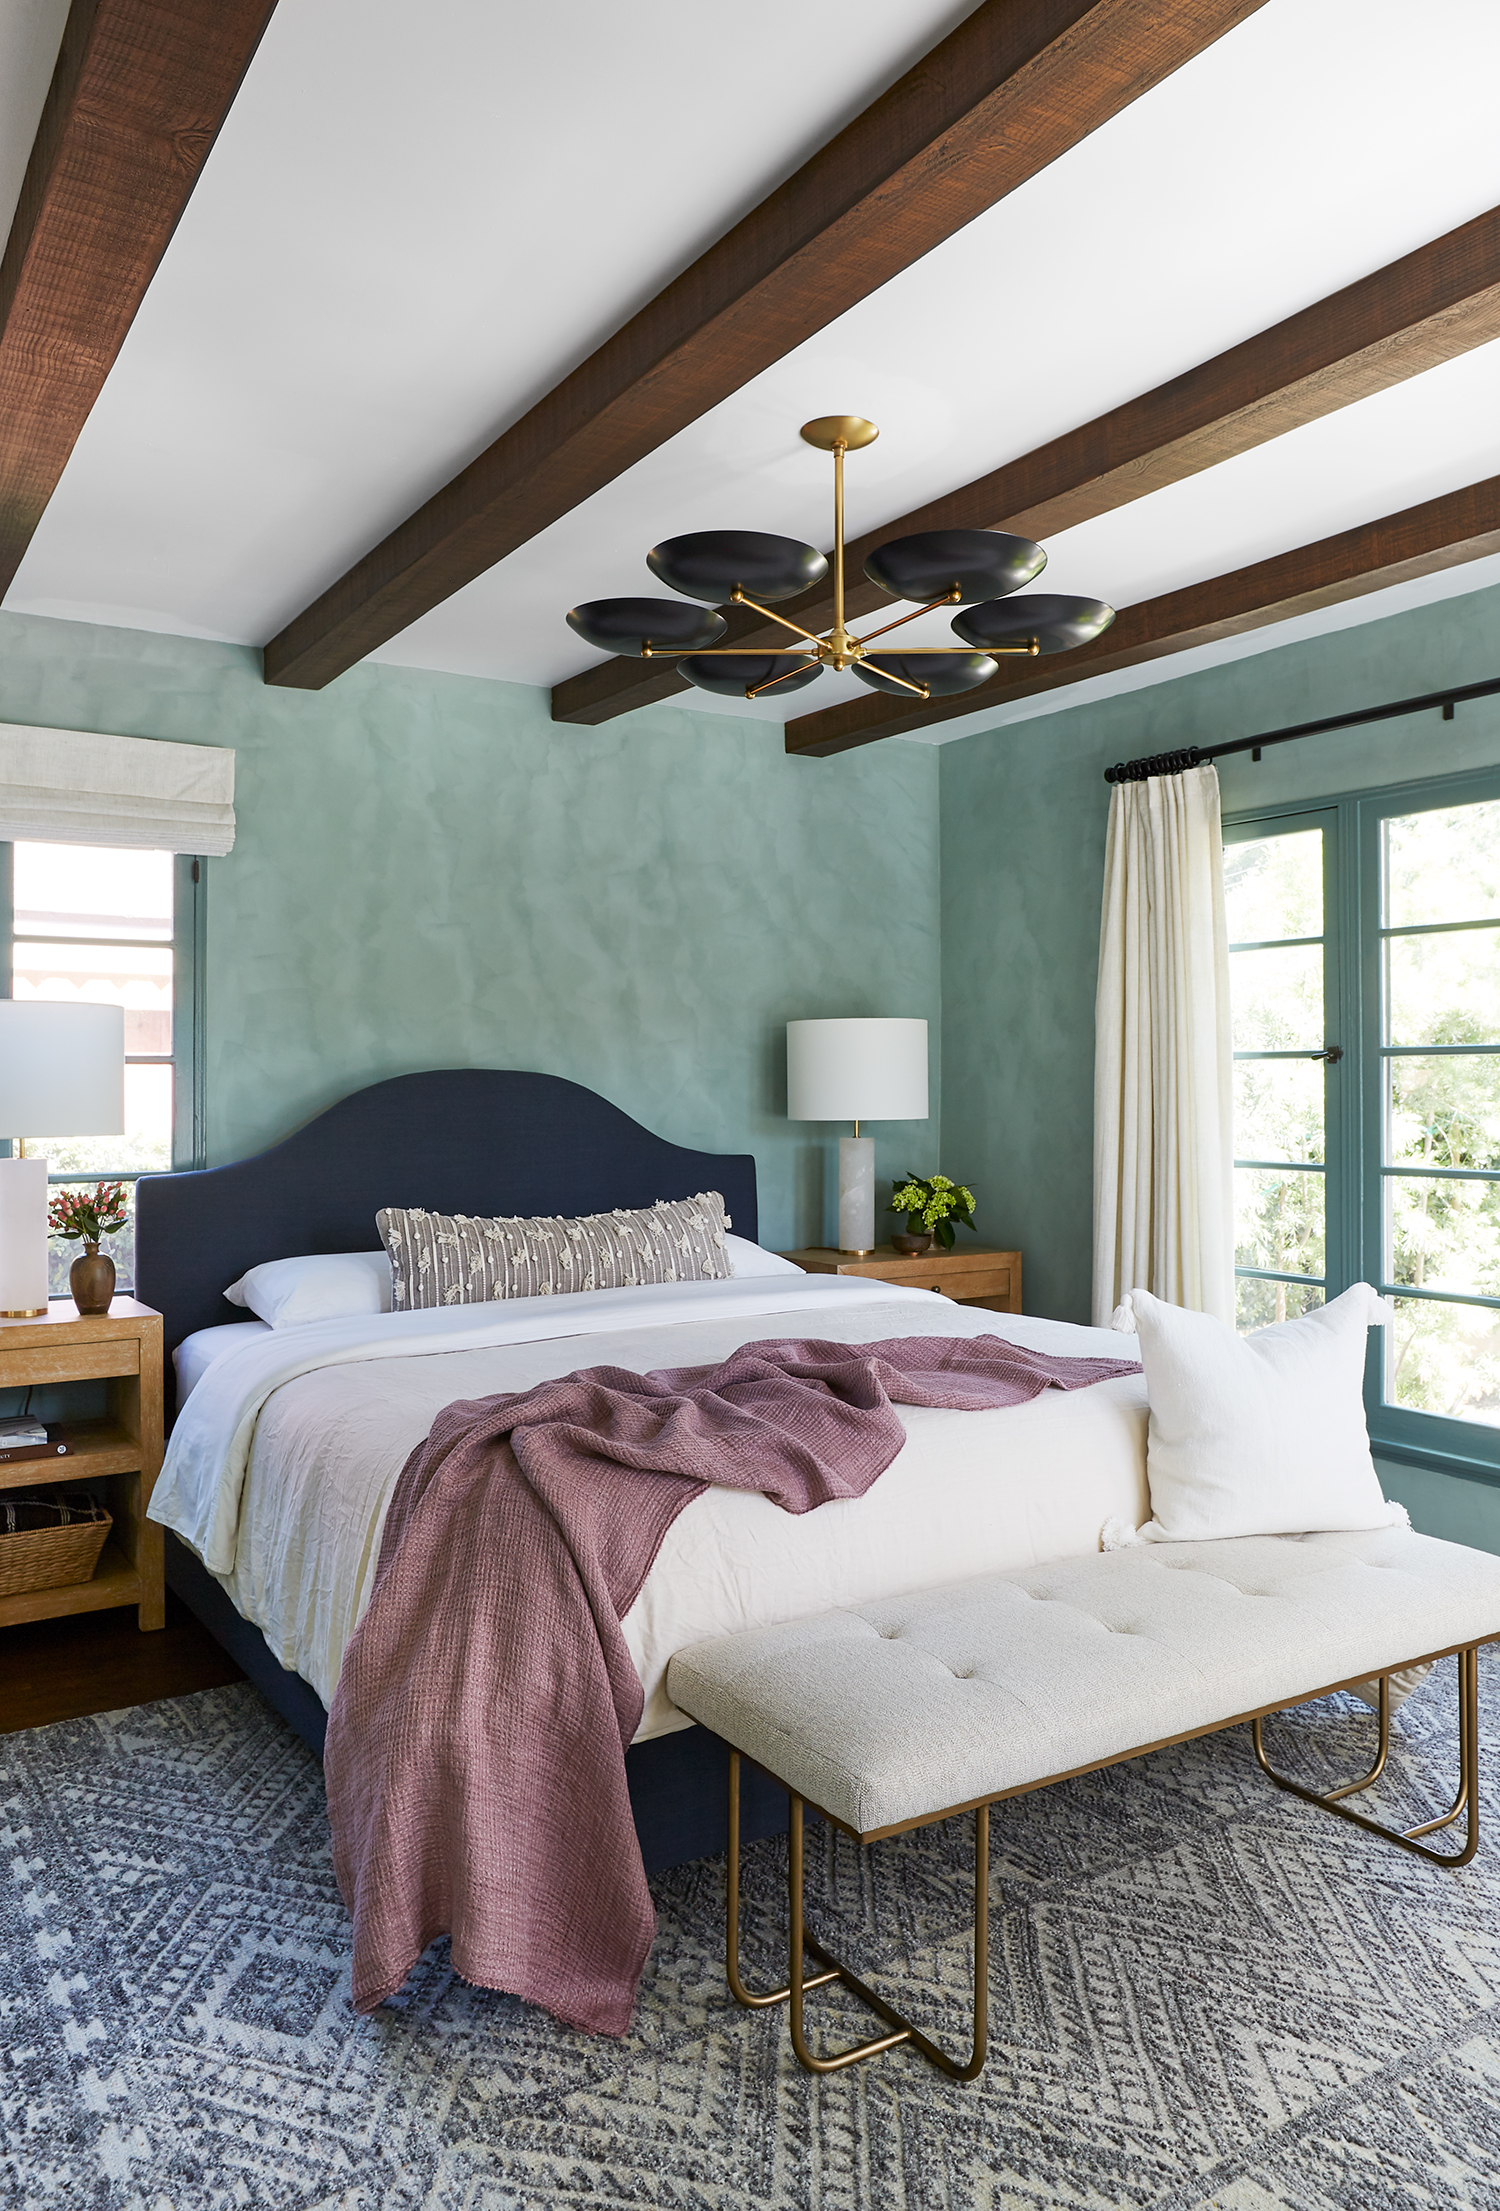
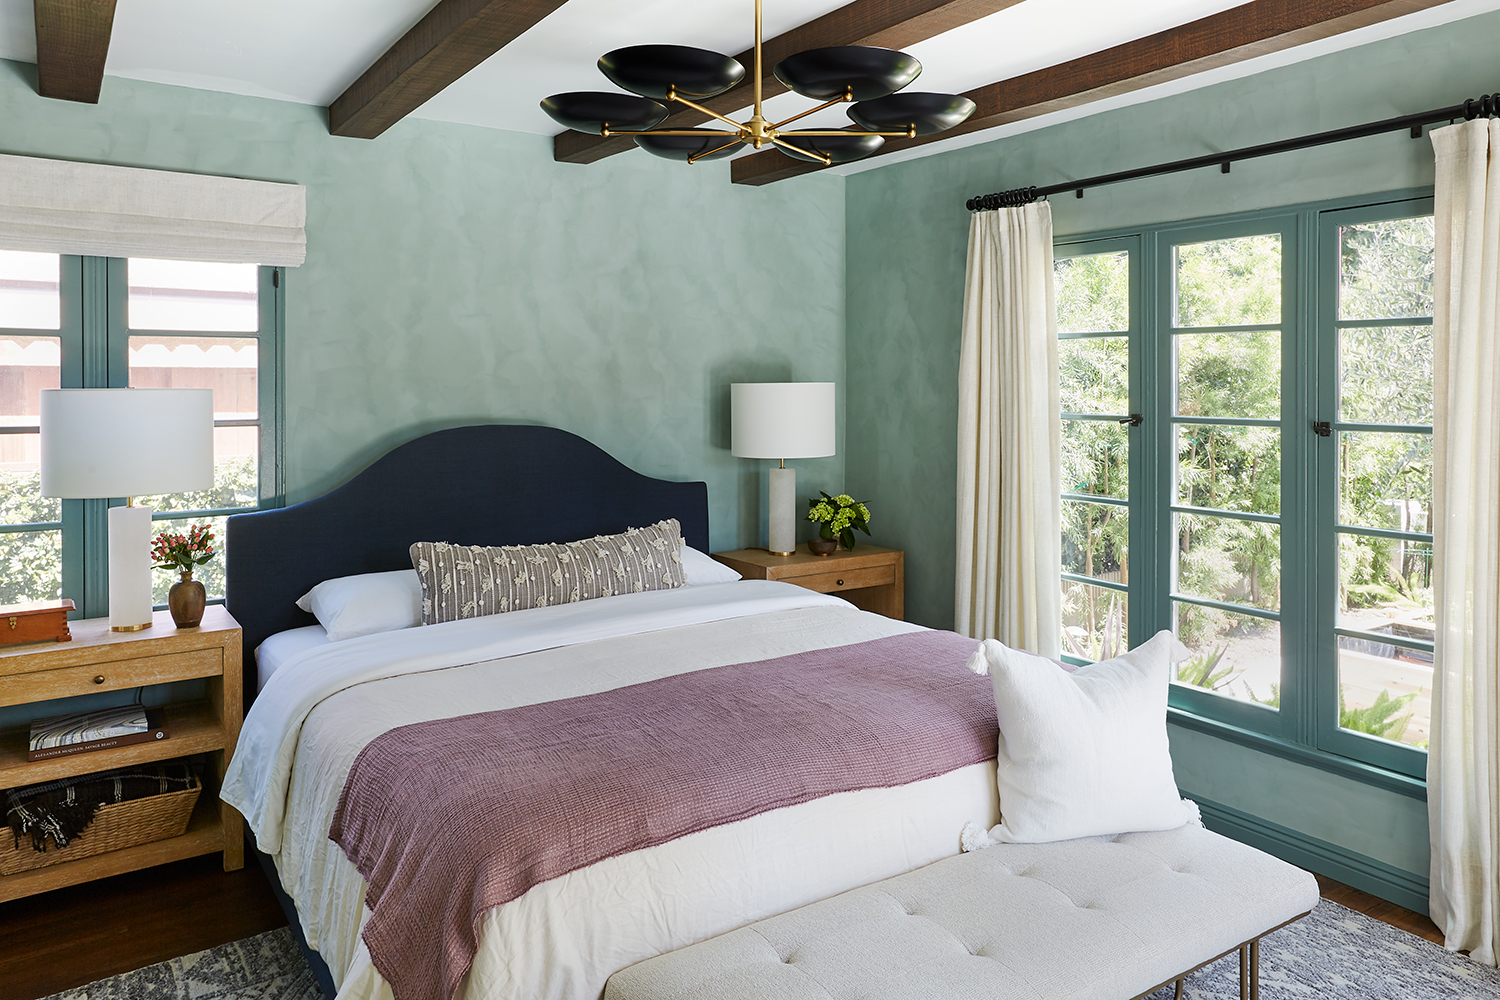
Can you even remember where we started? It was bland and gray and beige. The bedroom of our 1930 Spanish Bungalow obviously had potential (did you see those windows?), but it was a VERY FORGETTABLE and underwhelming space. When we moved into the Crhacienda in October 2017 we got so busy that we never prioritized our bedroom. The furniture from our condo never felt right and eventually the room was screaming for attention. Since the start of the challenge we’ve done so much (new faux wood ceiling beams, repaired electrical problems, wallpapered, added storage, installed a new window, painted – so much painting, and brought in tons of statement lighting)!

When I look back on the before photos the first word that comes to my mind is BASIC. It felt so uninspiring and not worthy of our home. Yes, the natural light and windows were lovely, but I wasn’t doing them any favors. I’m so annoyed with myself for never making the bed feel more important and for pushing the room off-center. It was clearly demanding to be made a focal point and that little walkway on the right side of the bed was just silly. Why did I live like that for so long!?
I’m so glad I was adventurous and painted the room a darker color. The rest of the house is painted in Whisper by Dunn Edwards (basically warm white) so it took some convincing to build up my courage and get my husband on board with bringing color into the bedroom. I don’t dislike color, but I also really love the ability to change a room over time when it has a neutral backdrop. Most design rules tell you that if a room gets great light you should paint it light; and if you have a small, dark room you should paint it dark to enhance the coziness. This was one of those times where I had to go with my gut and it TOTALLY paid off.
CLOSET BEFORE
Even the closet was just “meh”. Sure, it had that gorgeous built-in dresser and window working in it’s favor, but it was definitely time to add more storage to this 1930’s beauty. I also wanted it to feel like a special space. These little details bring so much joy as we use our home everyday. As I’m getting dressed in the morning I’m energized by the special touches in the design and being able to enjoy the view outside to our garden. I feel like a Disney princess!!
INSPIRATION
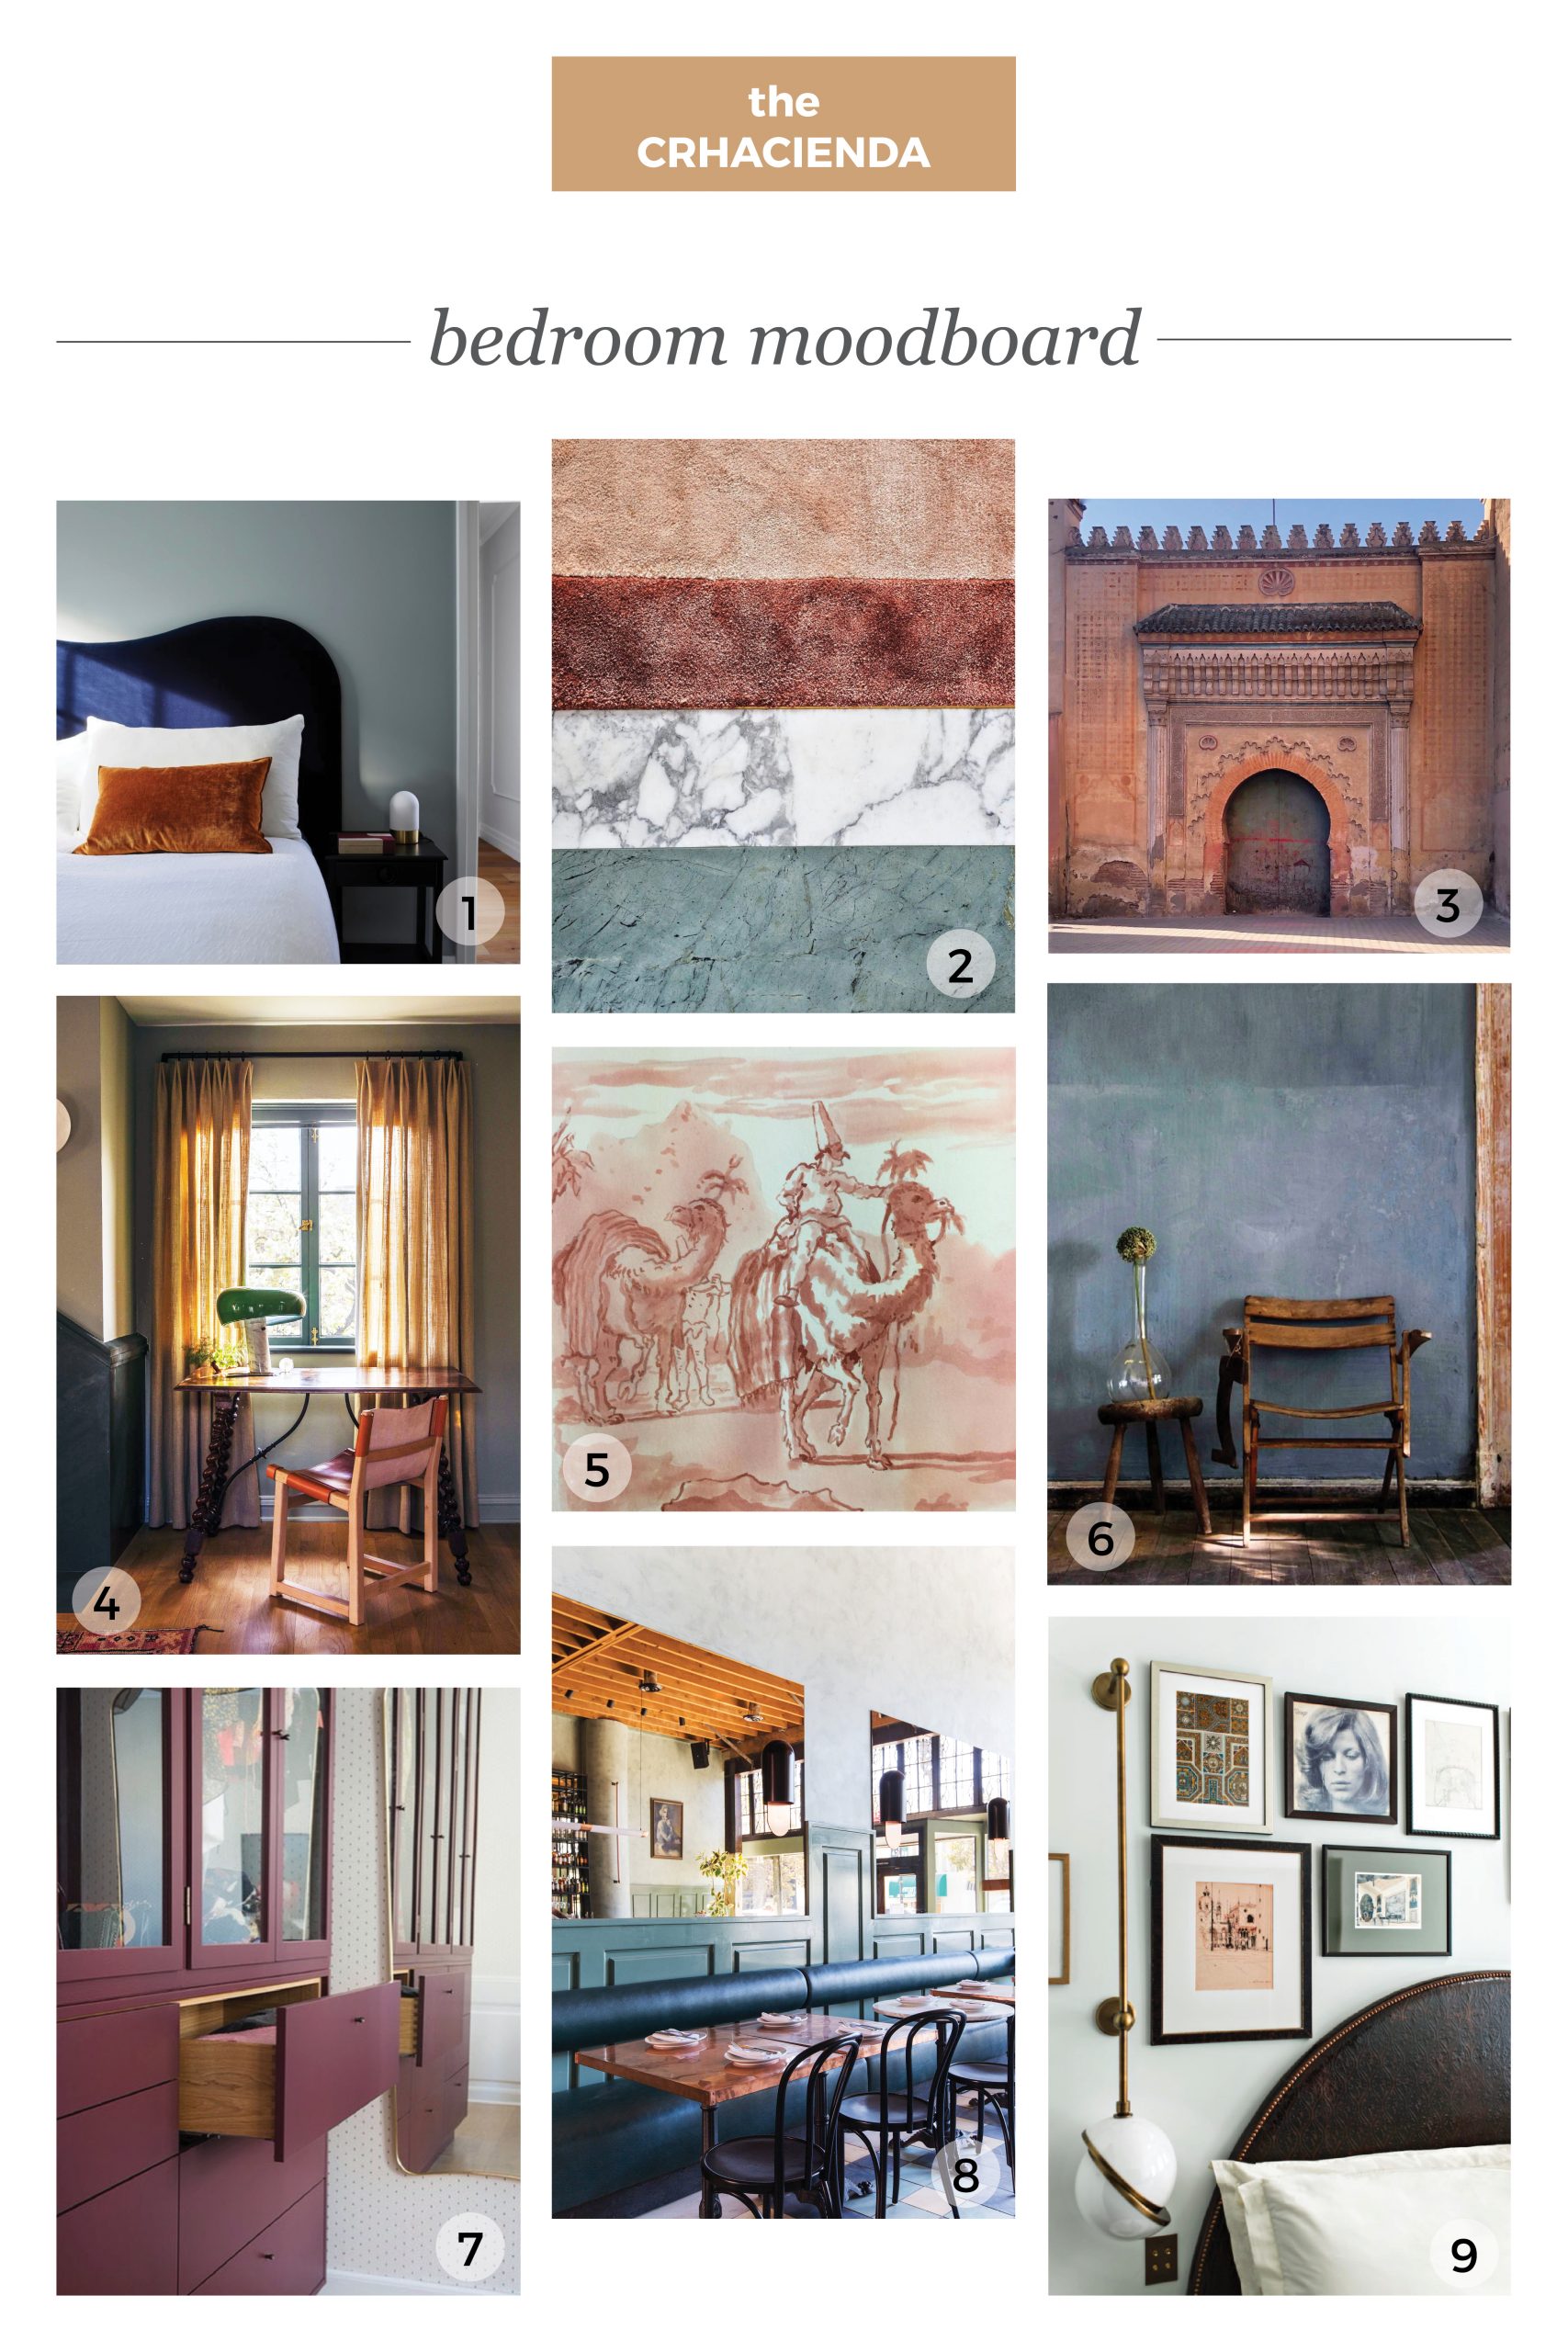
Bedroom Moodboard 1. Arent & Pyke | 2. Flack Studio | 3. Original Photography by Shaun Crha | 4. Reath Design | 5. Original Art by Jamie Tablason | 6. Bauwerk | 7. Københavns Møbelsnedkeri | 8. ETC.etera | 9. The Nomad Hotel DTLA
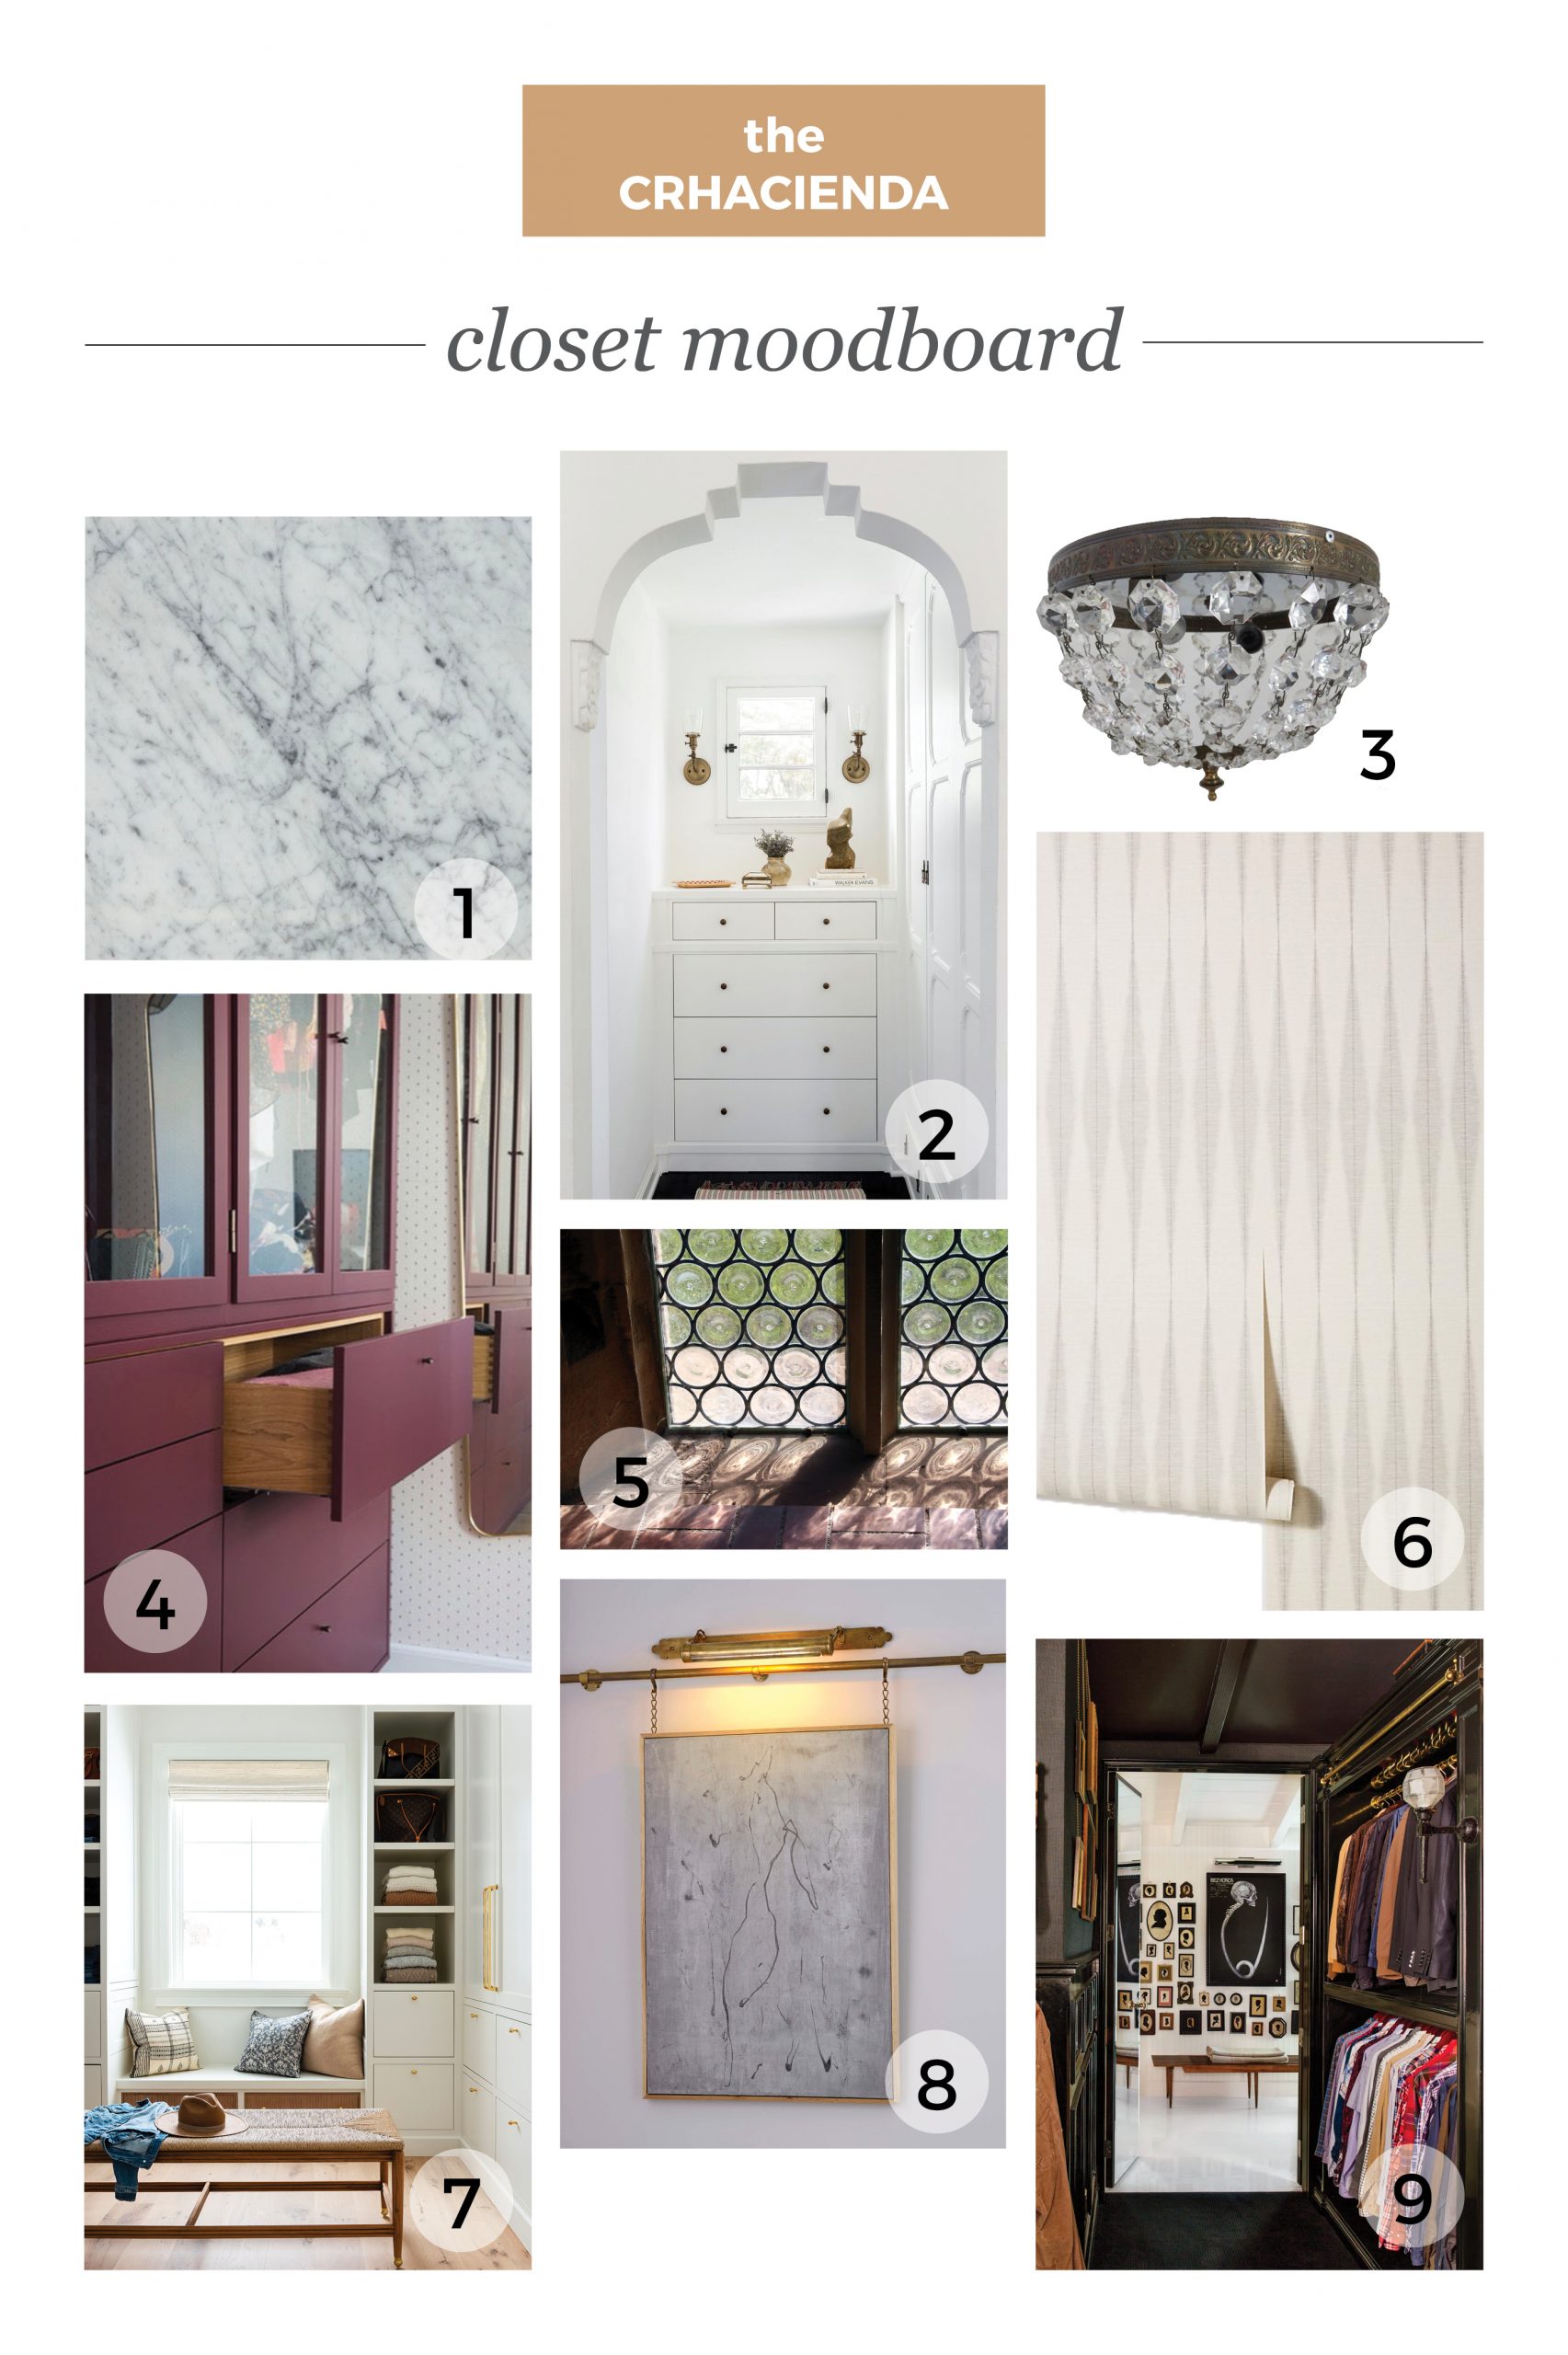
Closet Moodboard 1. Carrera Marble Dresser Top | 2. Katie Hodges Design | 3. Vintage French Flush Mount Light | 4. Københavns Møbelsnedkeri | 5. Rondel glass window on Flickr | 6. Wallpaper | 7. Closet by Studio McGee | 8. Brass Picture Rail | 9. Closet in Architectural Digest
I had some very ambitious plans for the master bedroom and the closet! If you remember all the way back to the first posts, the goal was to create an elevated and energetic room that sprinkled in old world influence, Moroccan charm, and a dash of English library. That’s a tall order for one small space, but I was determined to make it work.
THE ENTRY HALL
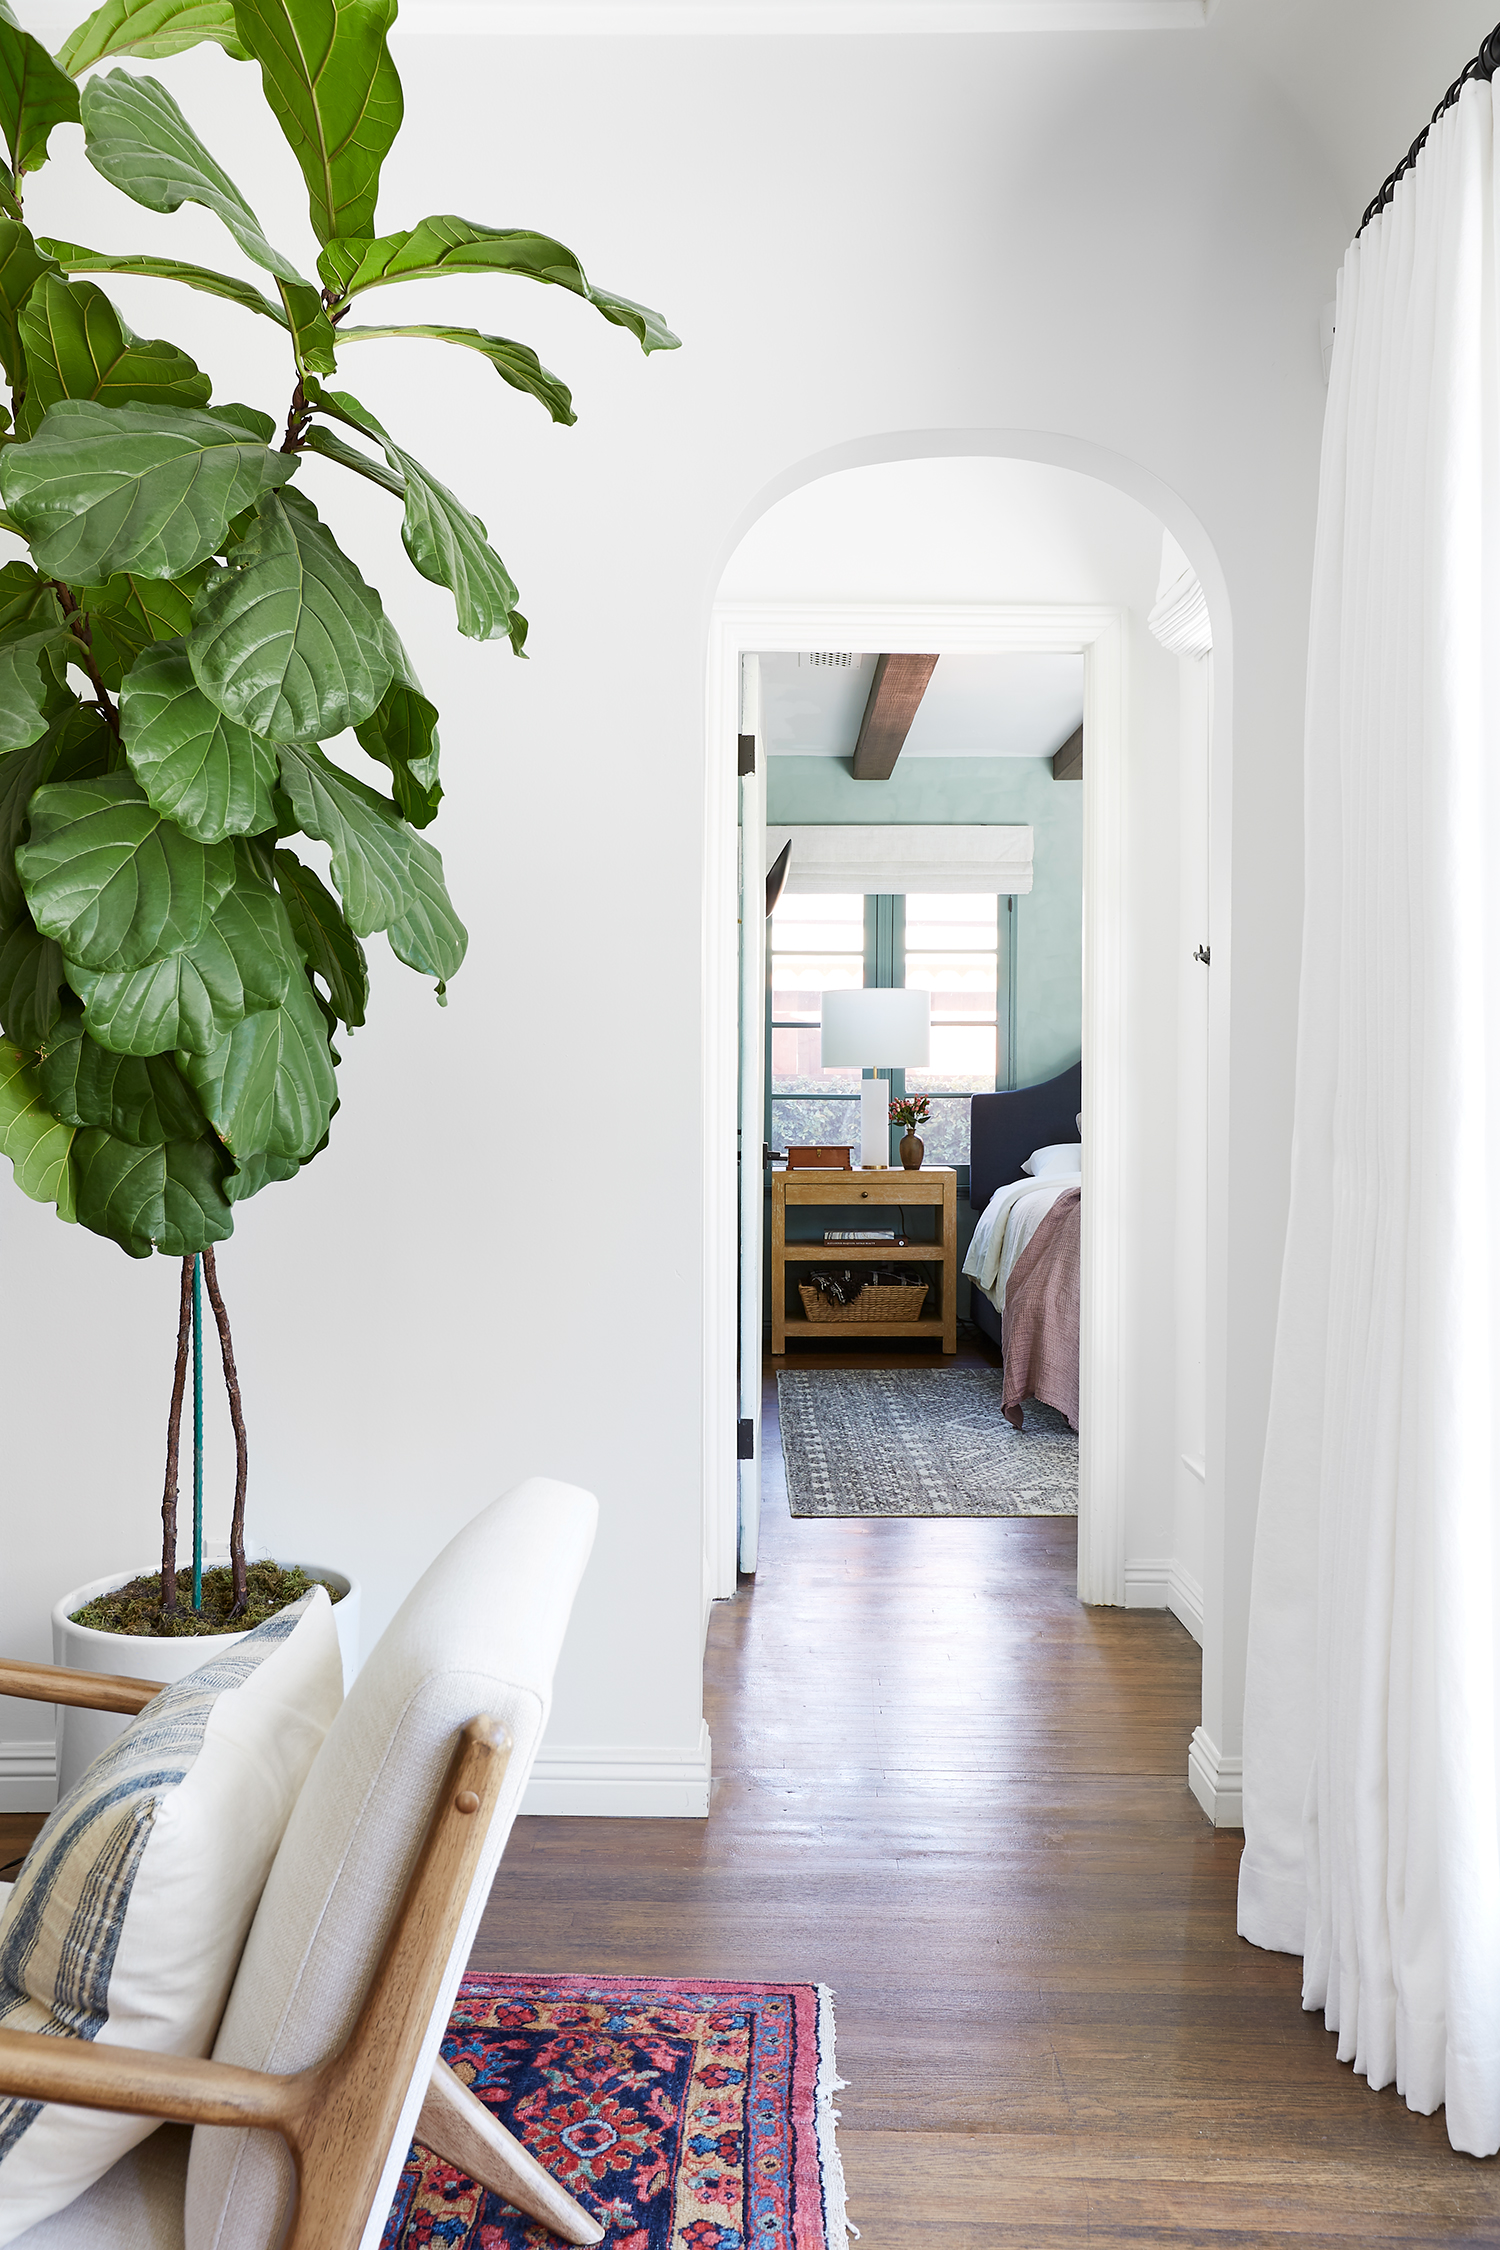
The peek-a-boo view of the bedroom as you’re coming from the living room is so exciting. As you come in the front door of the house you see this view and it’s so enchanting. I keep spotting the colorful walls, bright windows, and ceiling beams and I just keep wanting to go back into the bedroom and enjoy it. We leave the door open to our bedroom almost all the time now. We haven’t had any guests over to our house (#campcovid life), but I think it’ll be fun to see their reactions when the spot the bedroom as they come in the house.
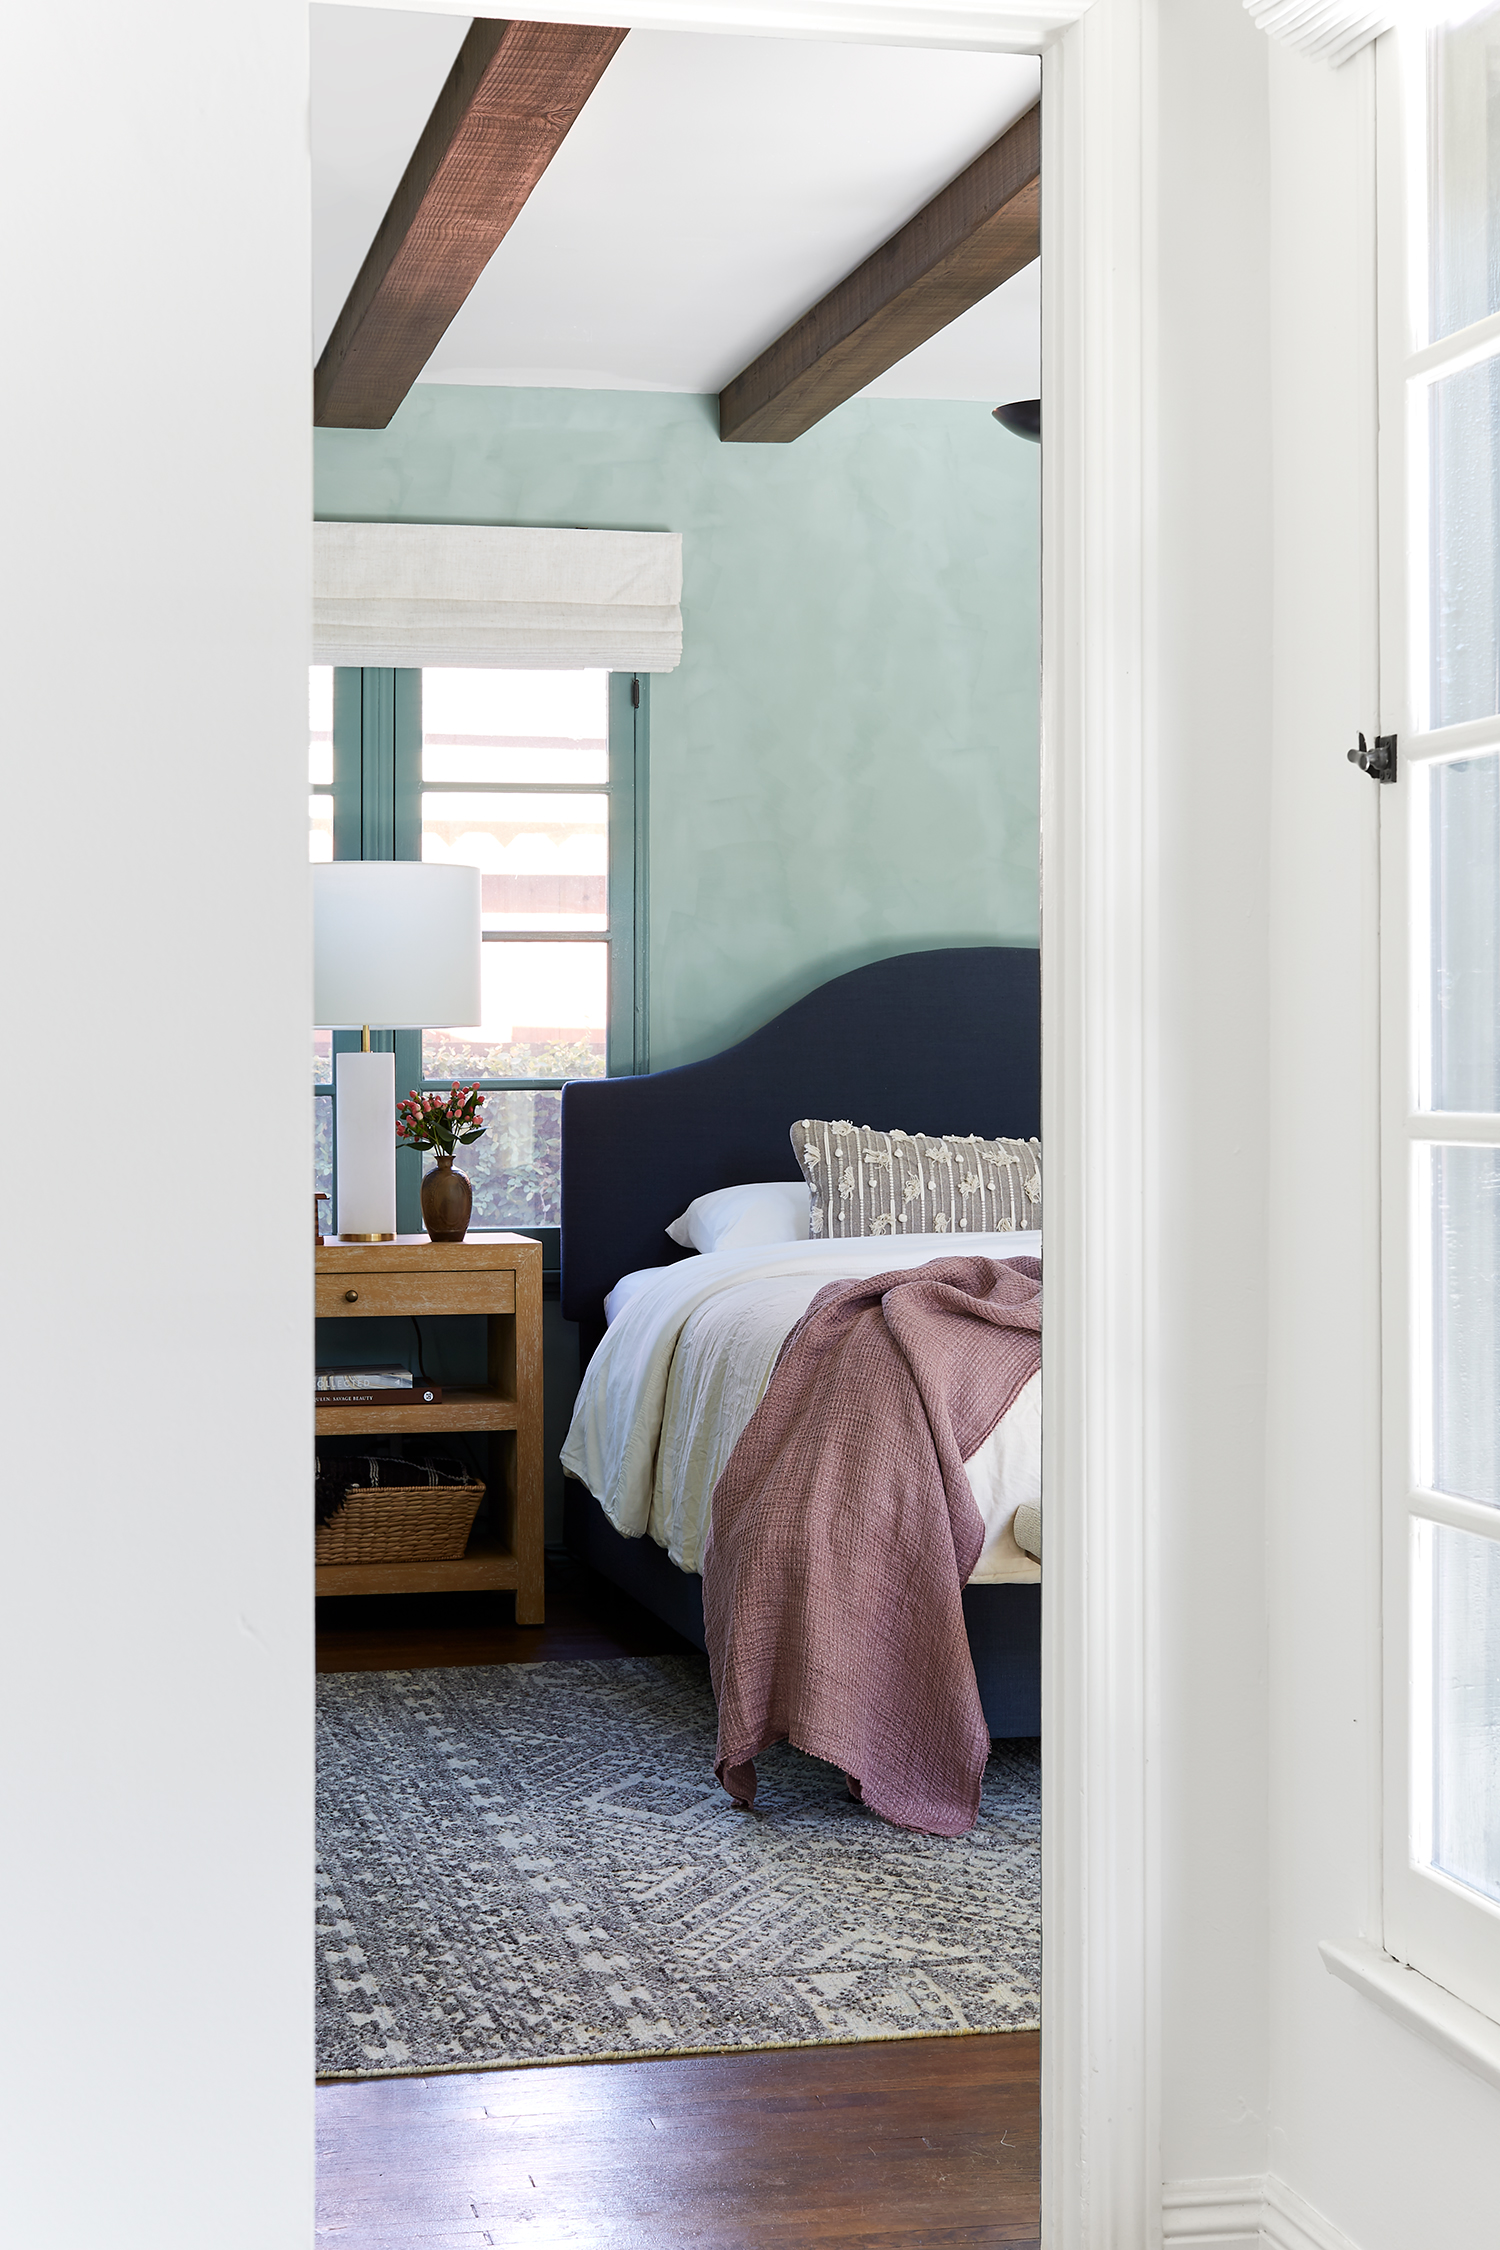
THE BEAMS
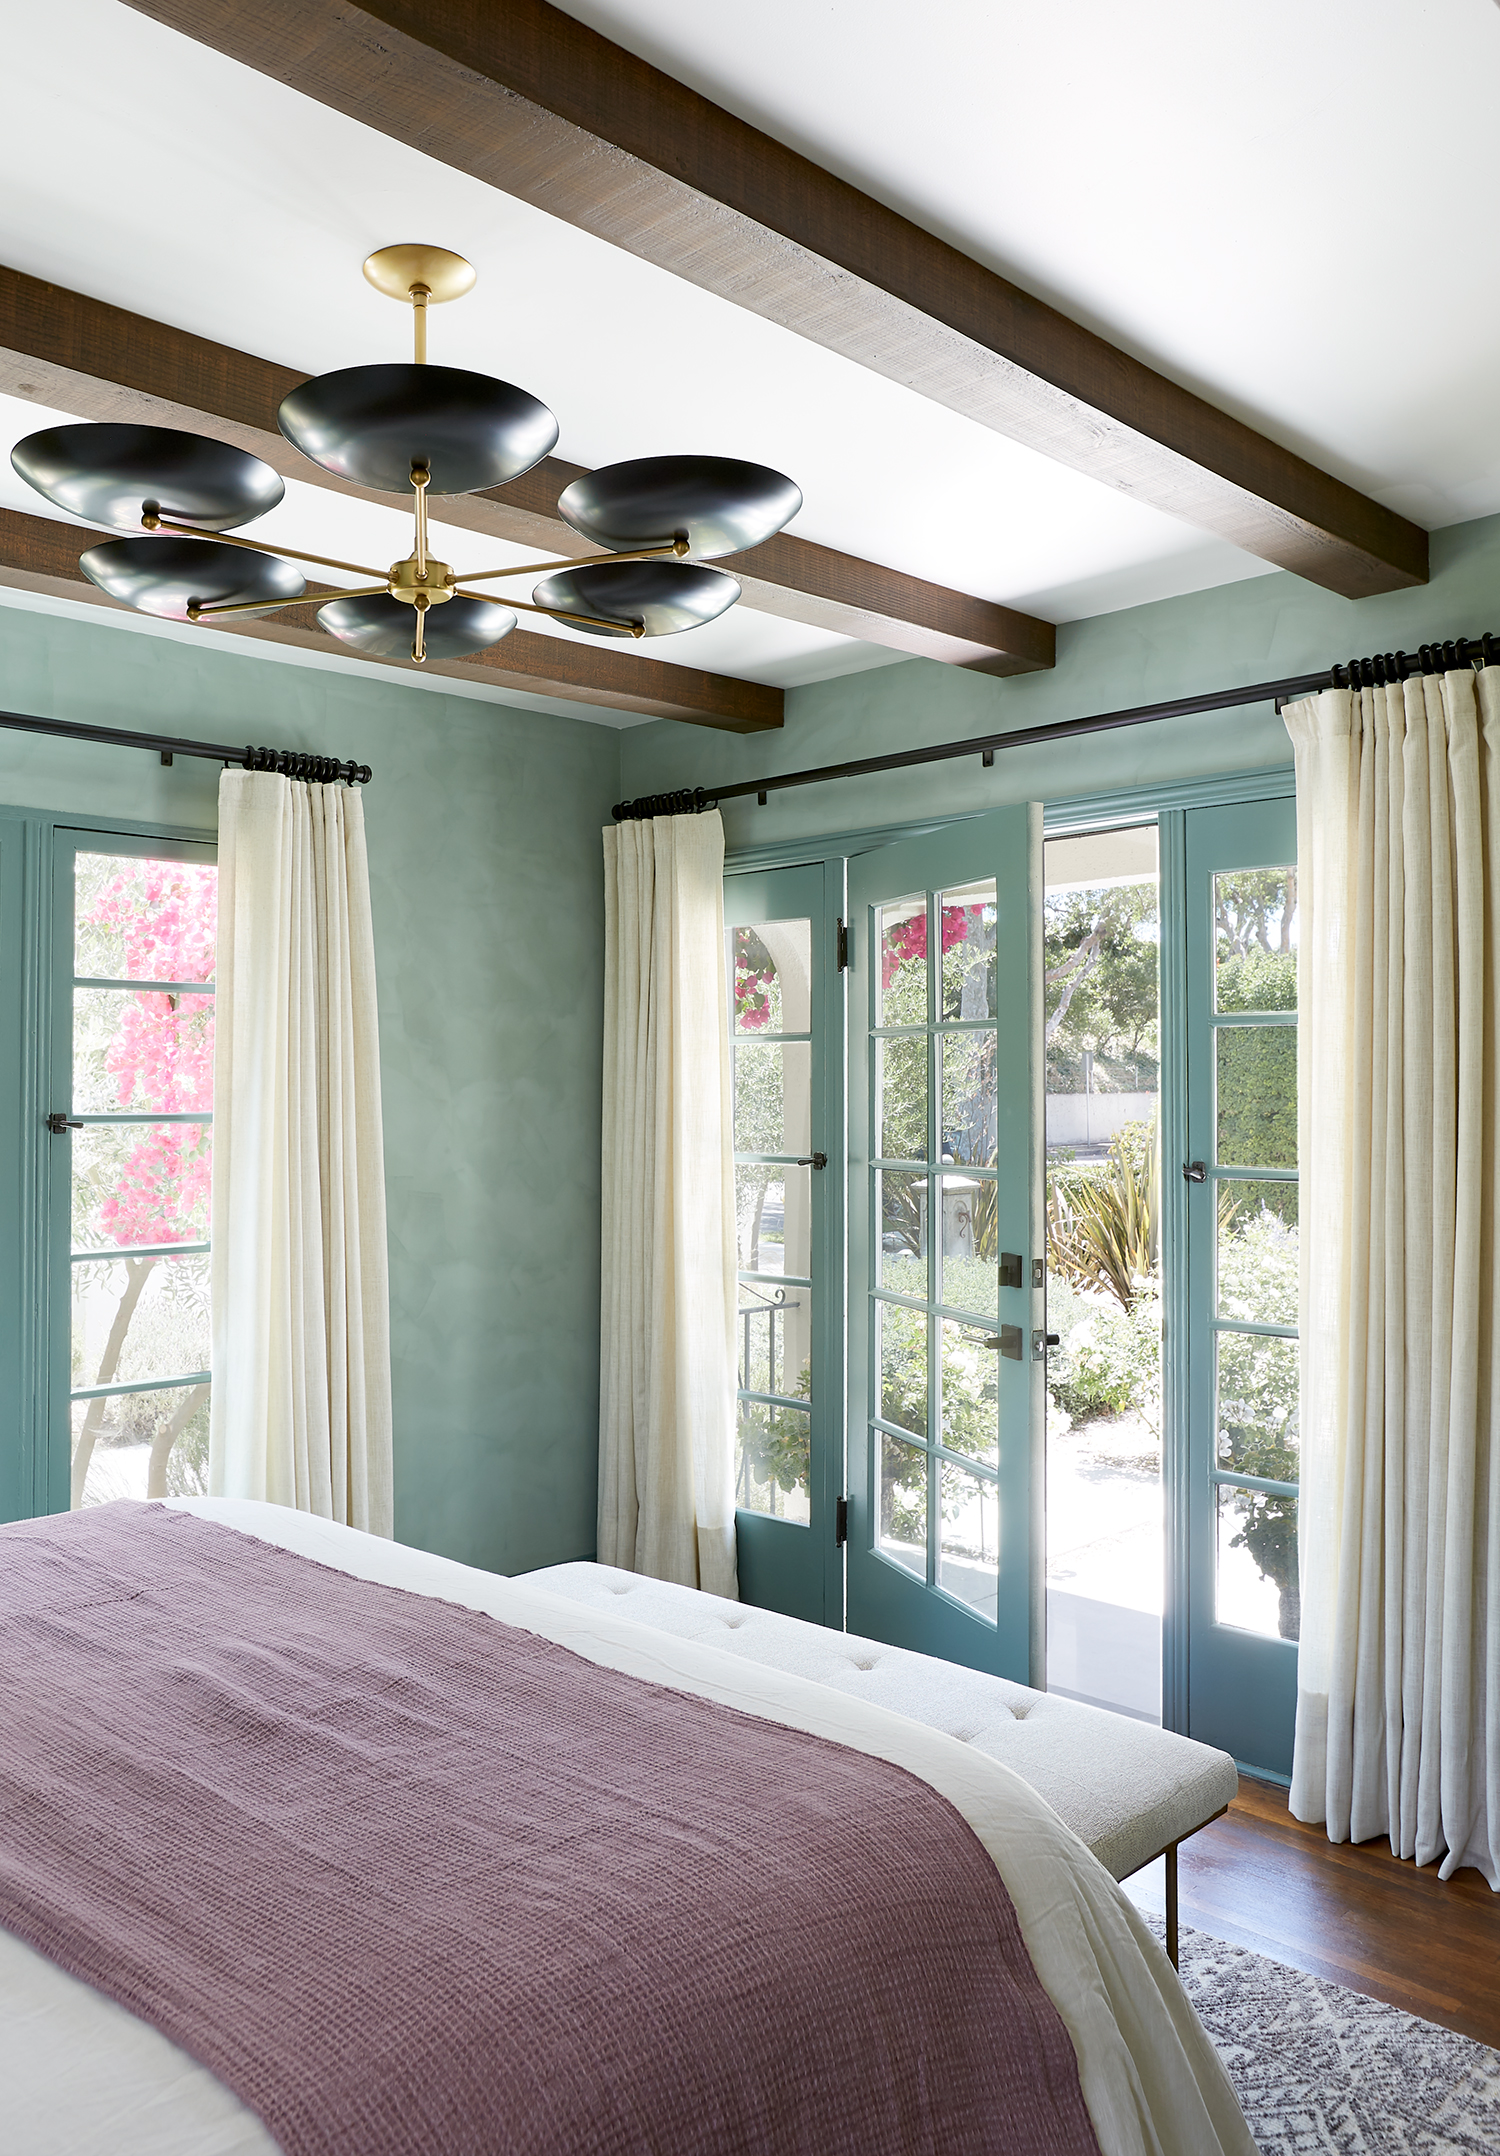
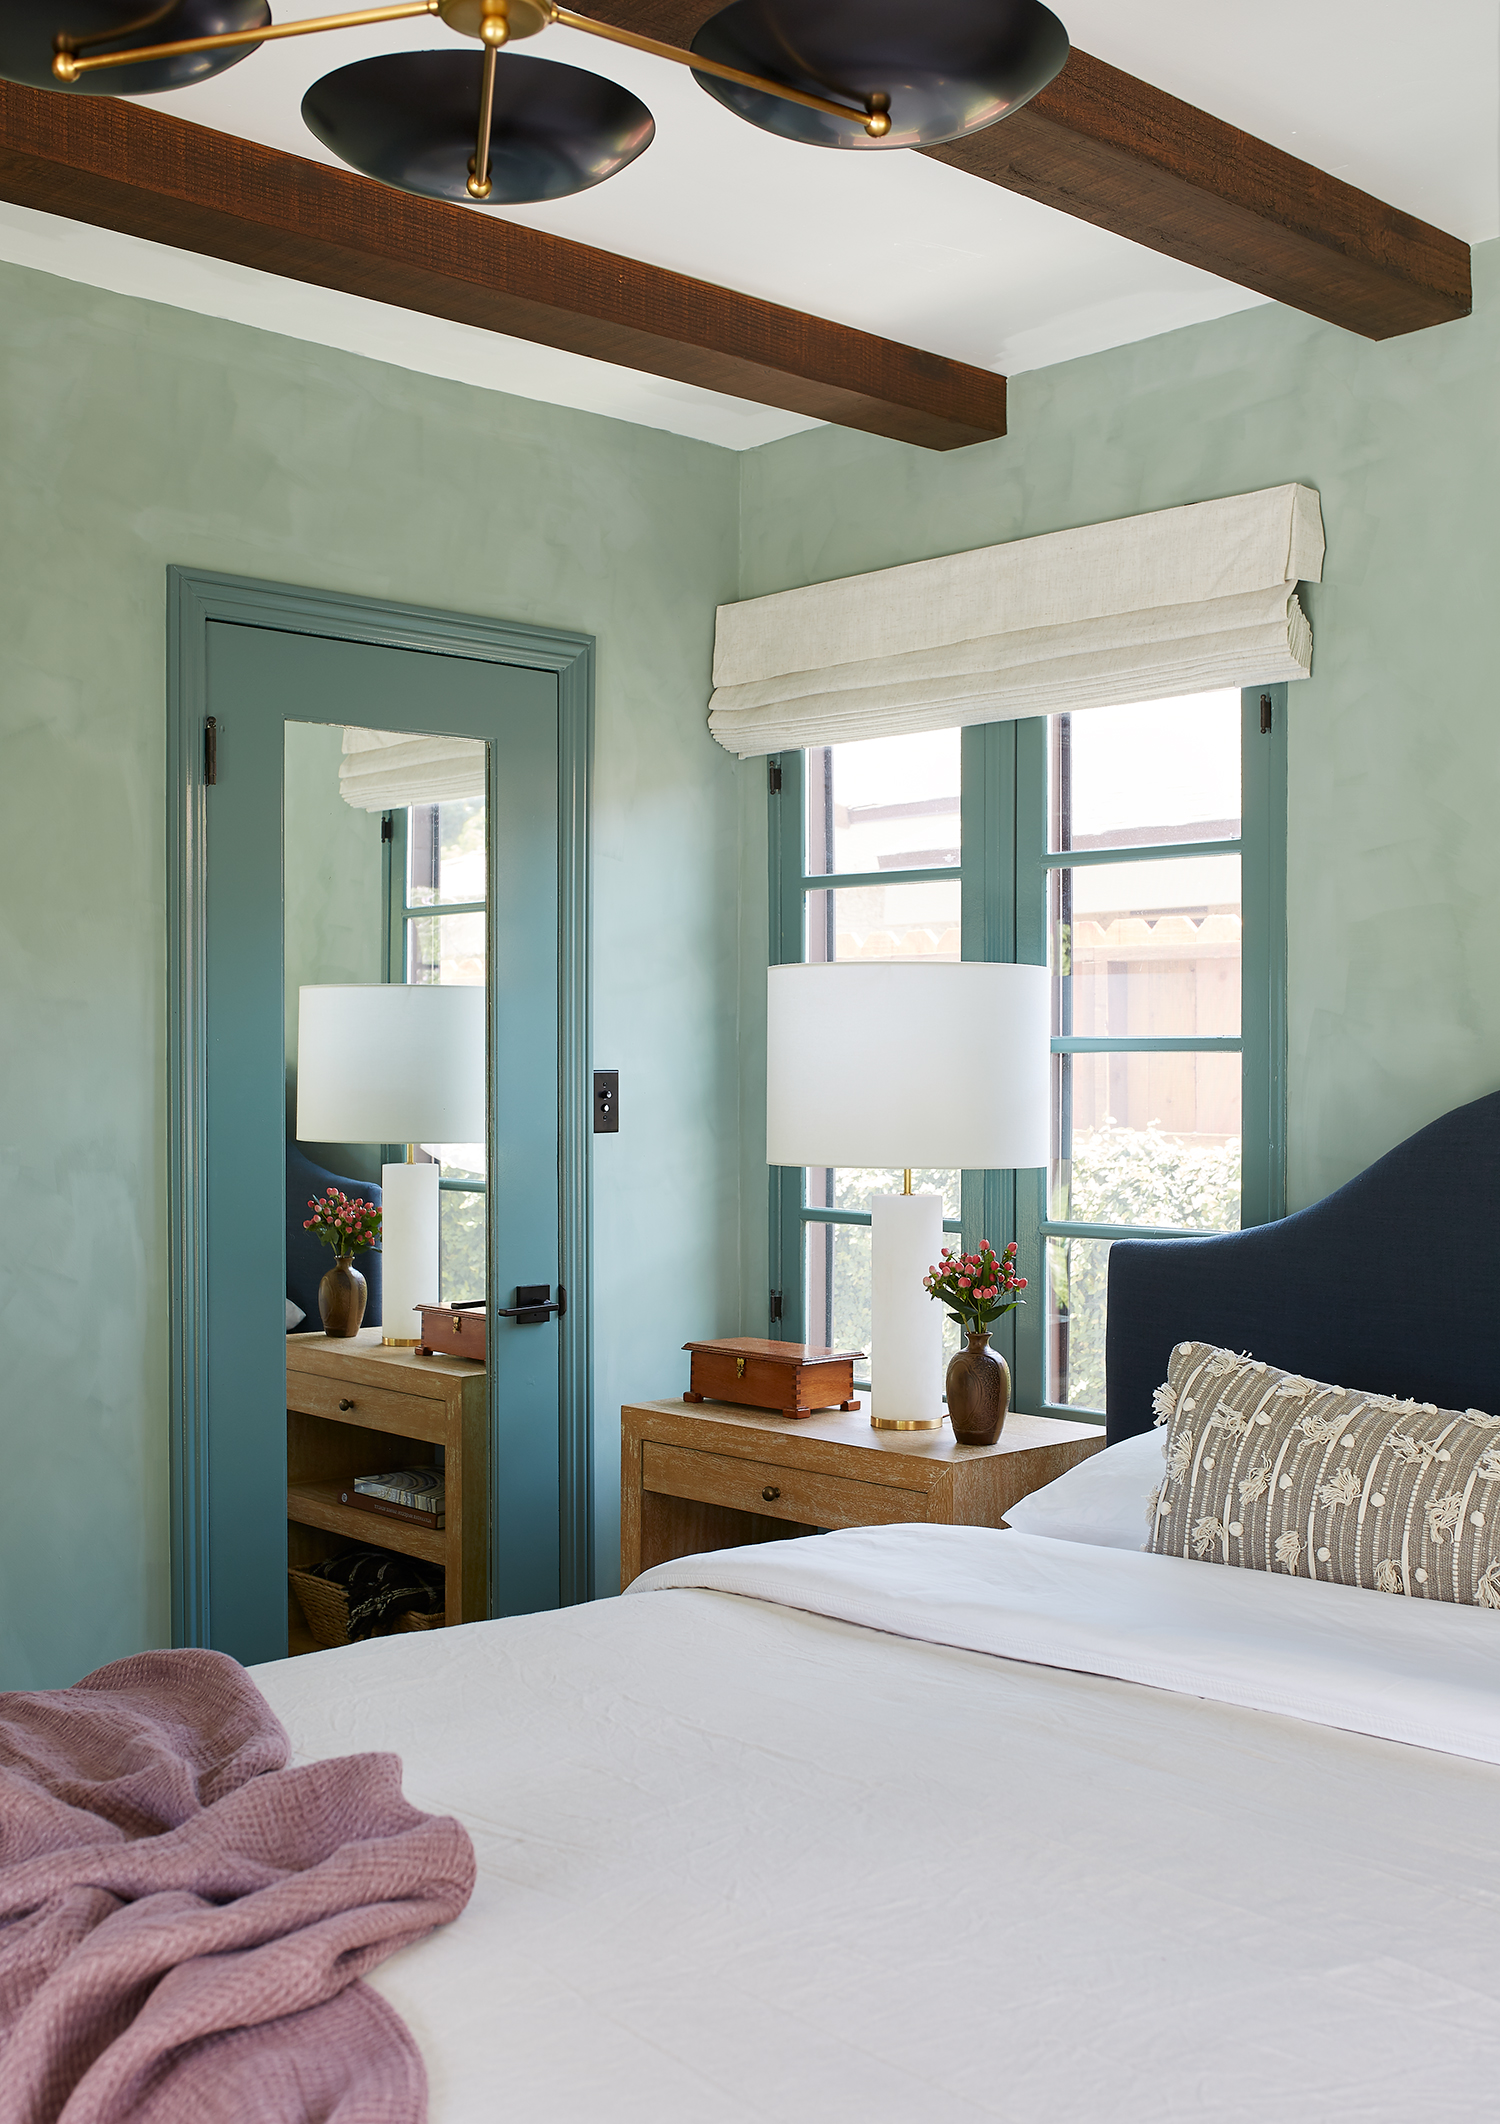
Speaking of reactions, can we talk about those beams? They were one of the single most transformational moments in the entire bedroom makeover. I really have to give it to my partner, Faux Wood Beams, for how easy it was to install this gorgeous product. The rich walnut finish and resawn wood effect are spectacular. And yes, just a reminder, these are made of foam and will fool your eye into thinking they’re real wood! The lightweight foam made the beams quick to put up and I don’t have to worry about adding additional weight to our plaster ceiling like I would with wood beams.
Now you would think that adding beams would make your ceilings feel lower, but the truth is that the beams give the impression that our ceiling are higher by drawing our eyes up. Our ceilings are just over 8 feet and we installed 4″ high x 6″ wide beams so they would feel like they were original to the house. They have a visual weight to them that feels like they could be holding up our roof, but aren’t so thick that they eat up the height of the room. Let’s not forget that I’m a straight up sucker for symmetry and the beams help balance the space. It’s just so dang pleasing to the eye!
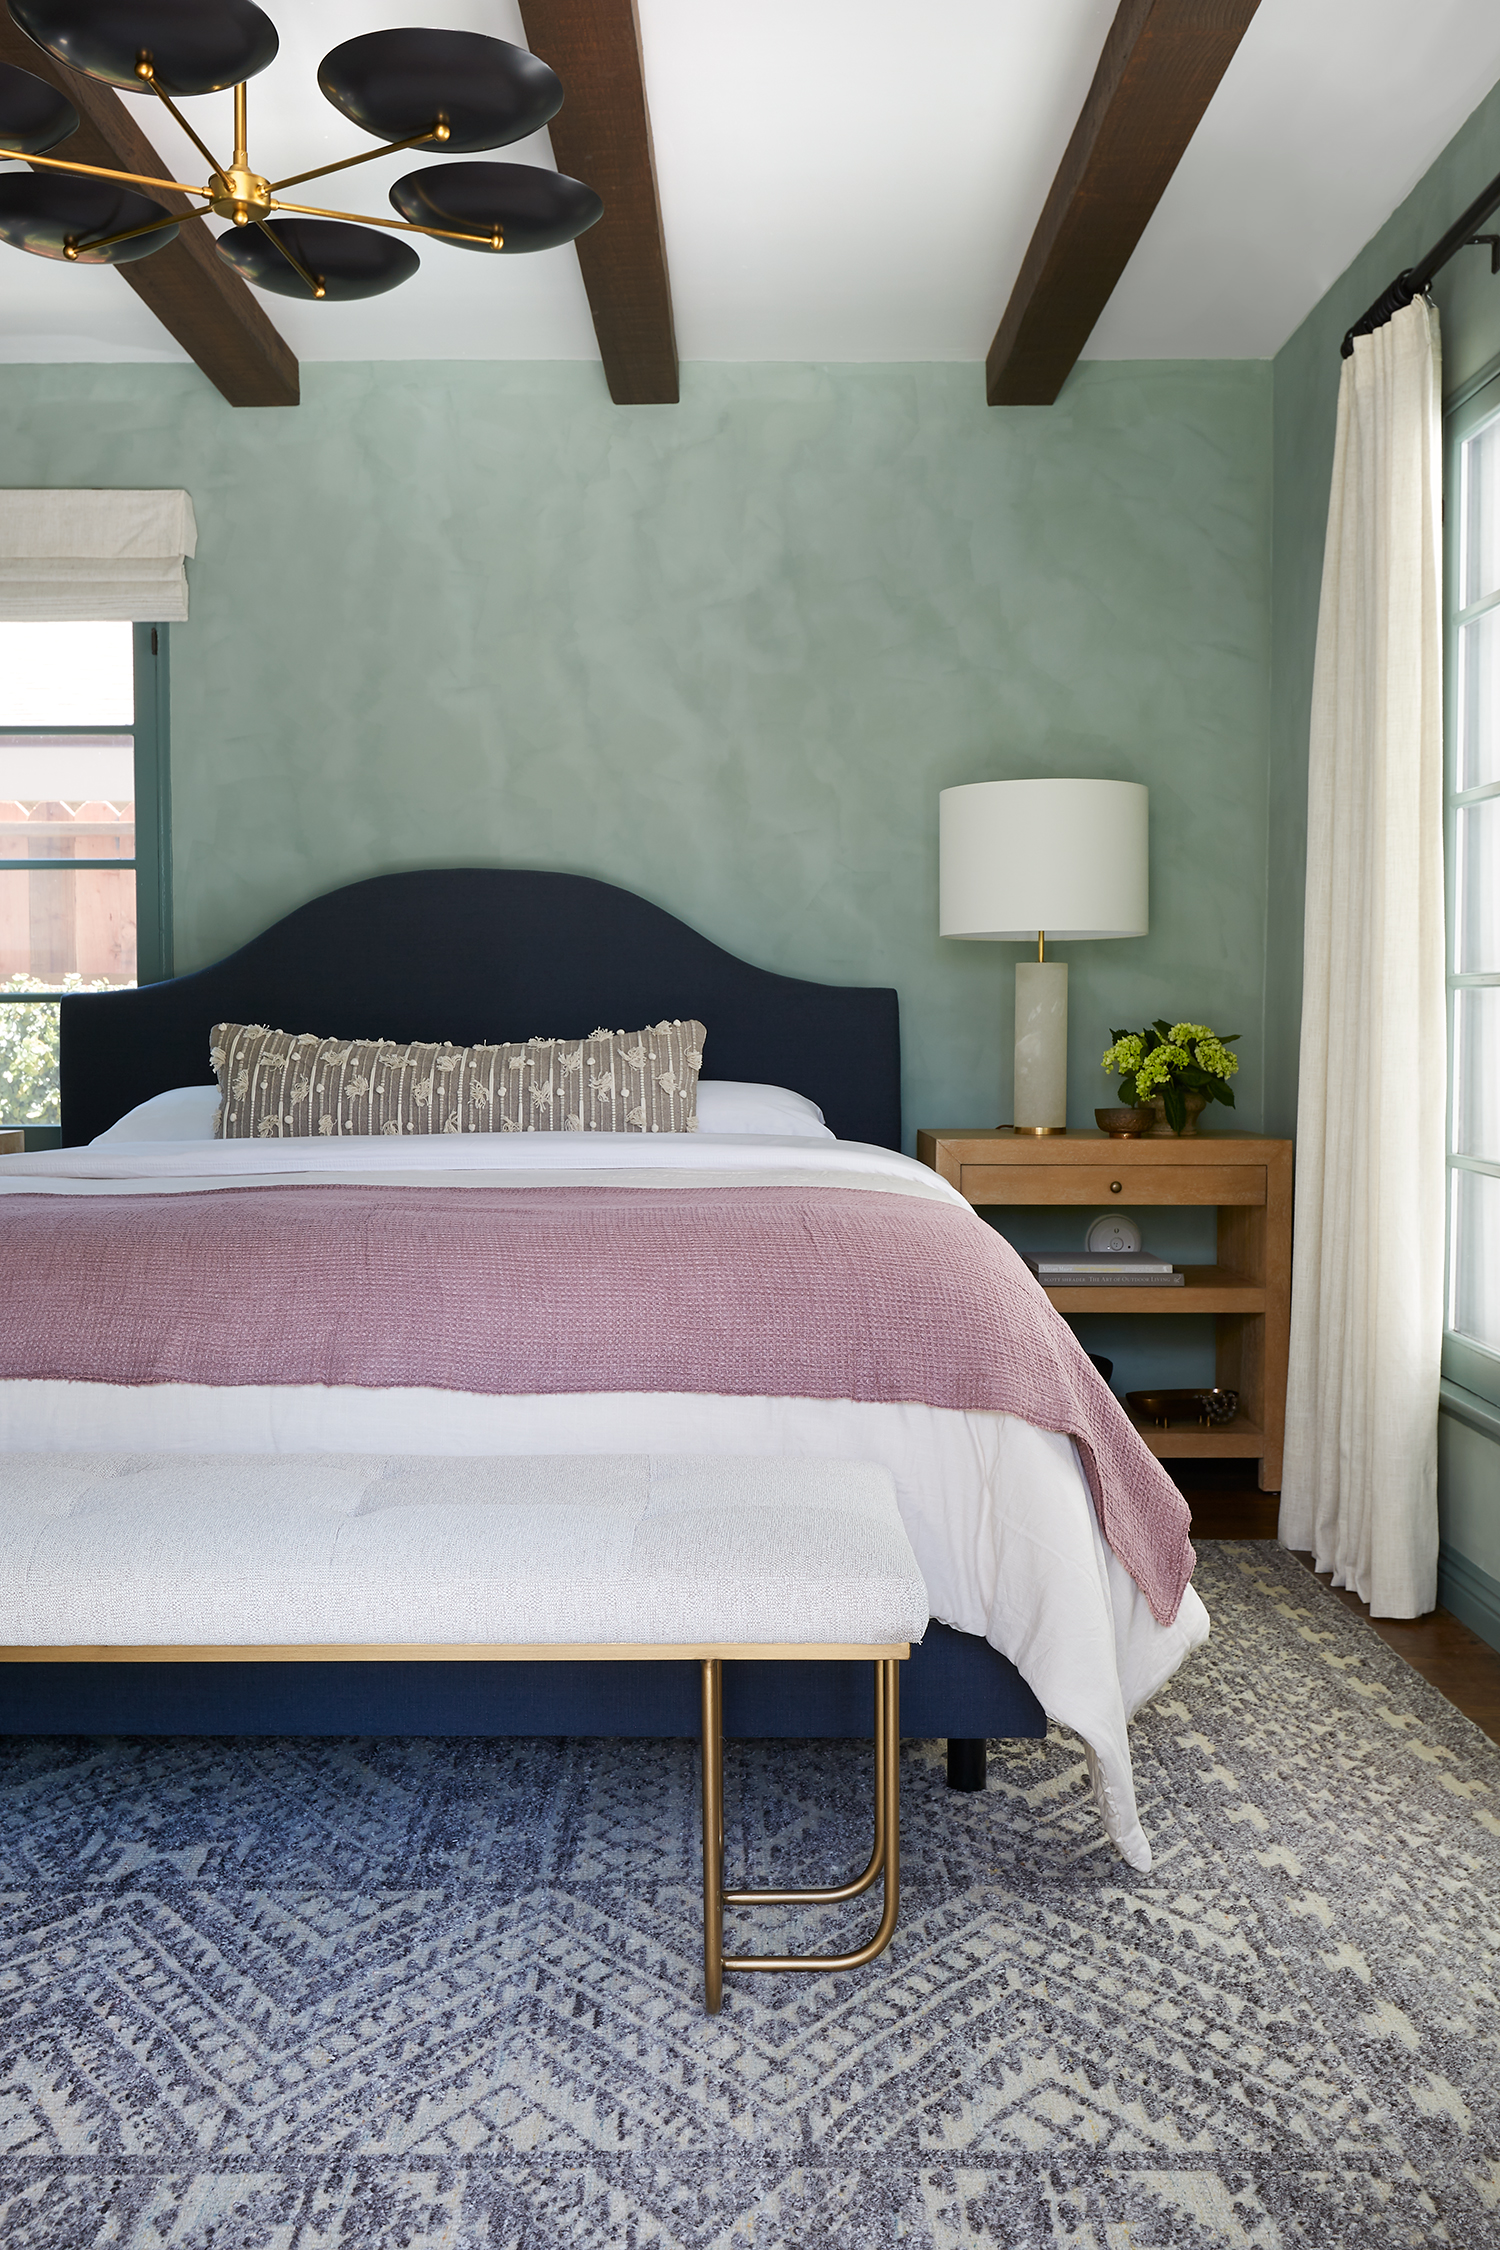
The entire room is grounded on this gorgeous rug from Jaipur Living. It’s 100% hand-knotted wool and it’s so soft and textural under foot. I love the variation in the fibers because it enhances the hand-made quality of the rug. It somehow feels more authentic to the room and the pattern ties into the wallpaper in the closet. Let’s not forget, it’s going to be very forgiving with stains (a natural side effect of having dogs).
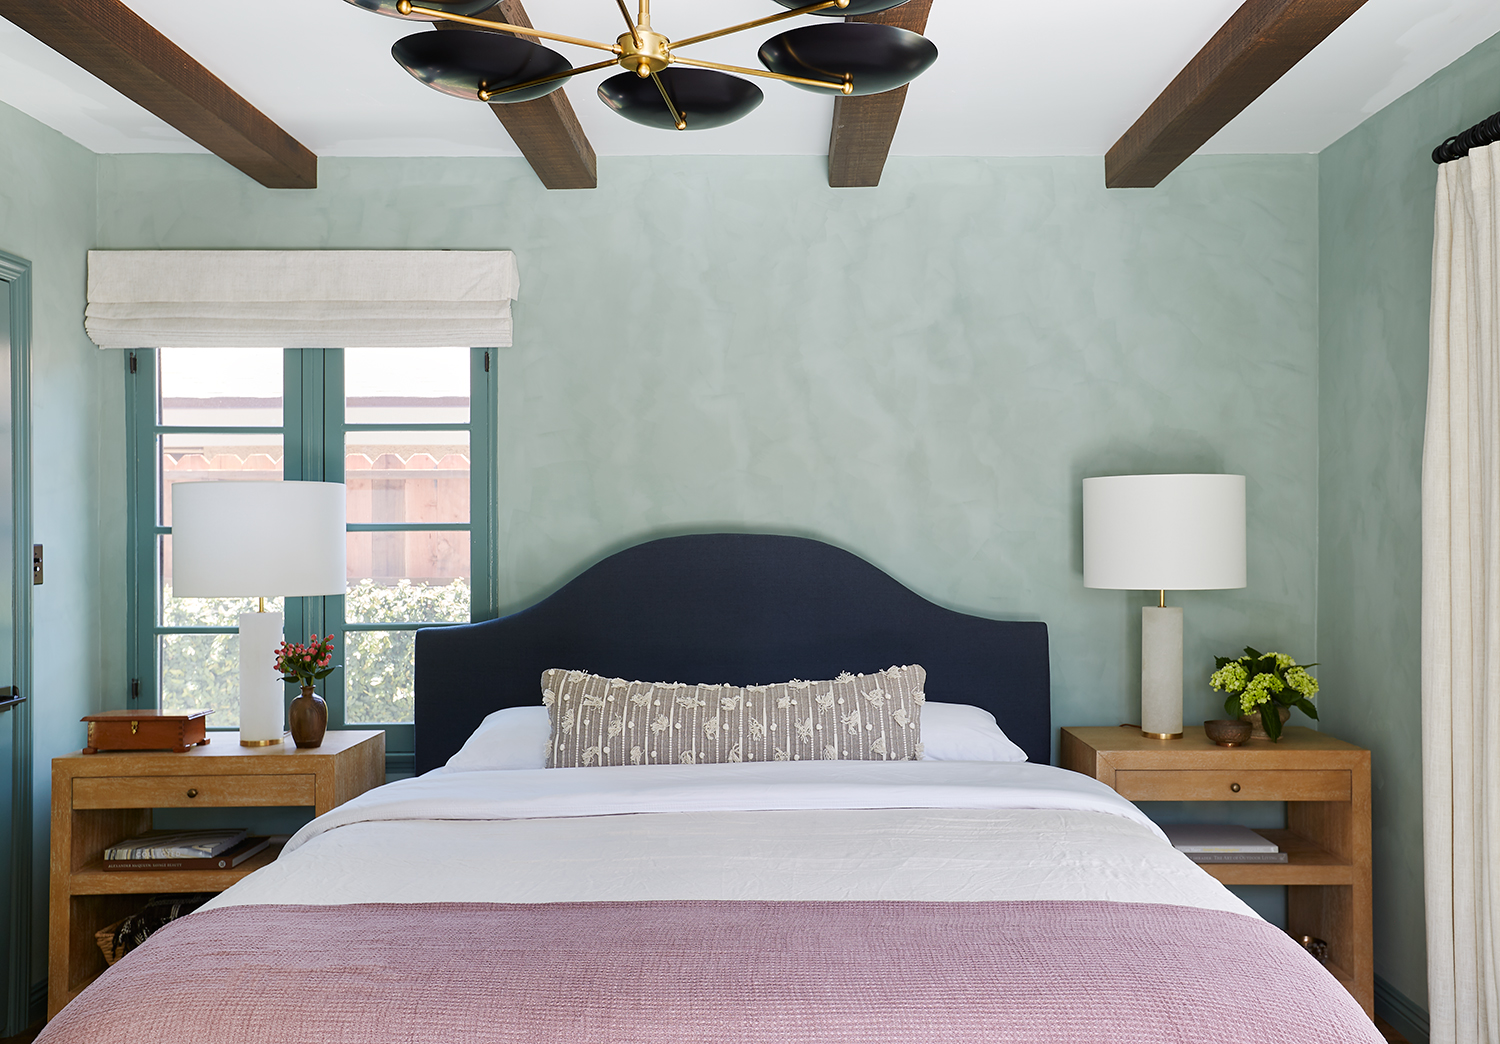
THE BED
Bed | Throw Blanket in Berry | Bolster Pillow | Linen Accent Pillow in Cream
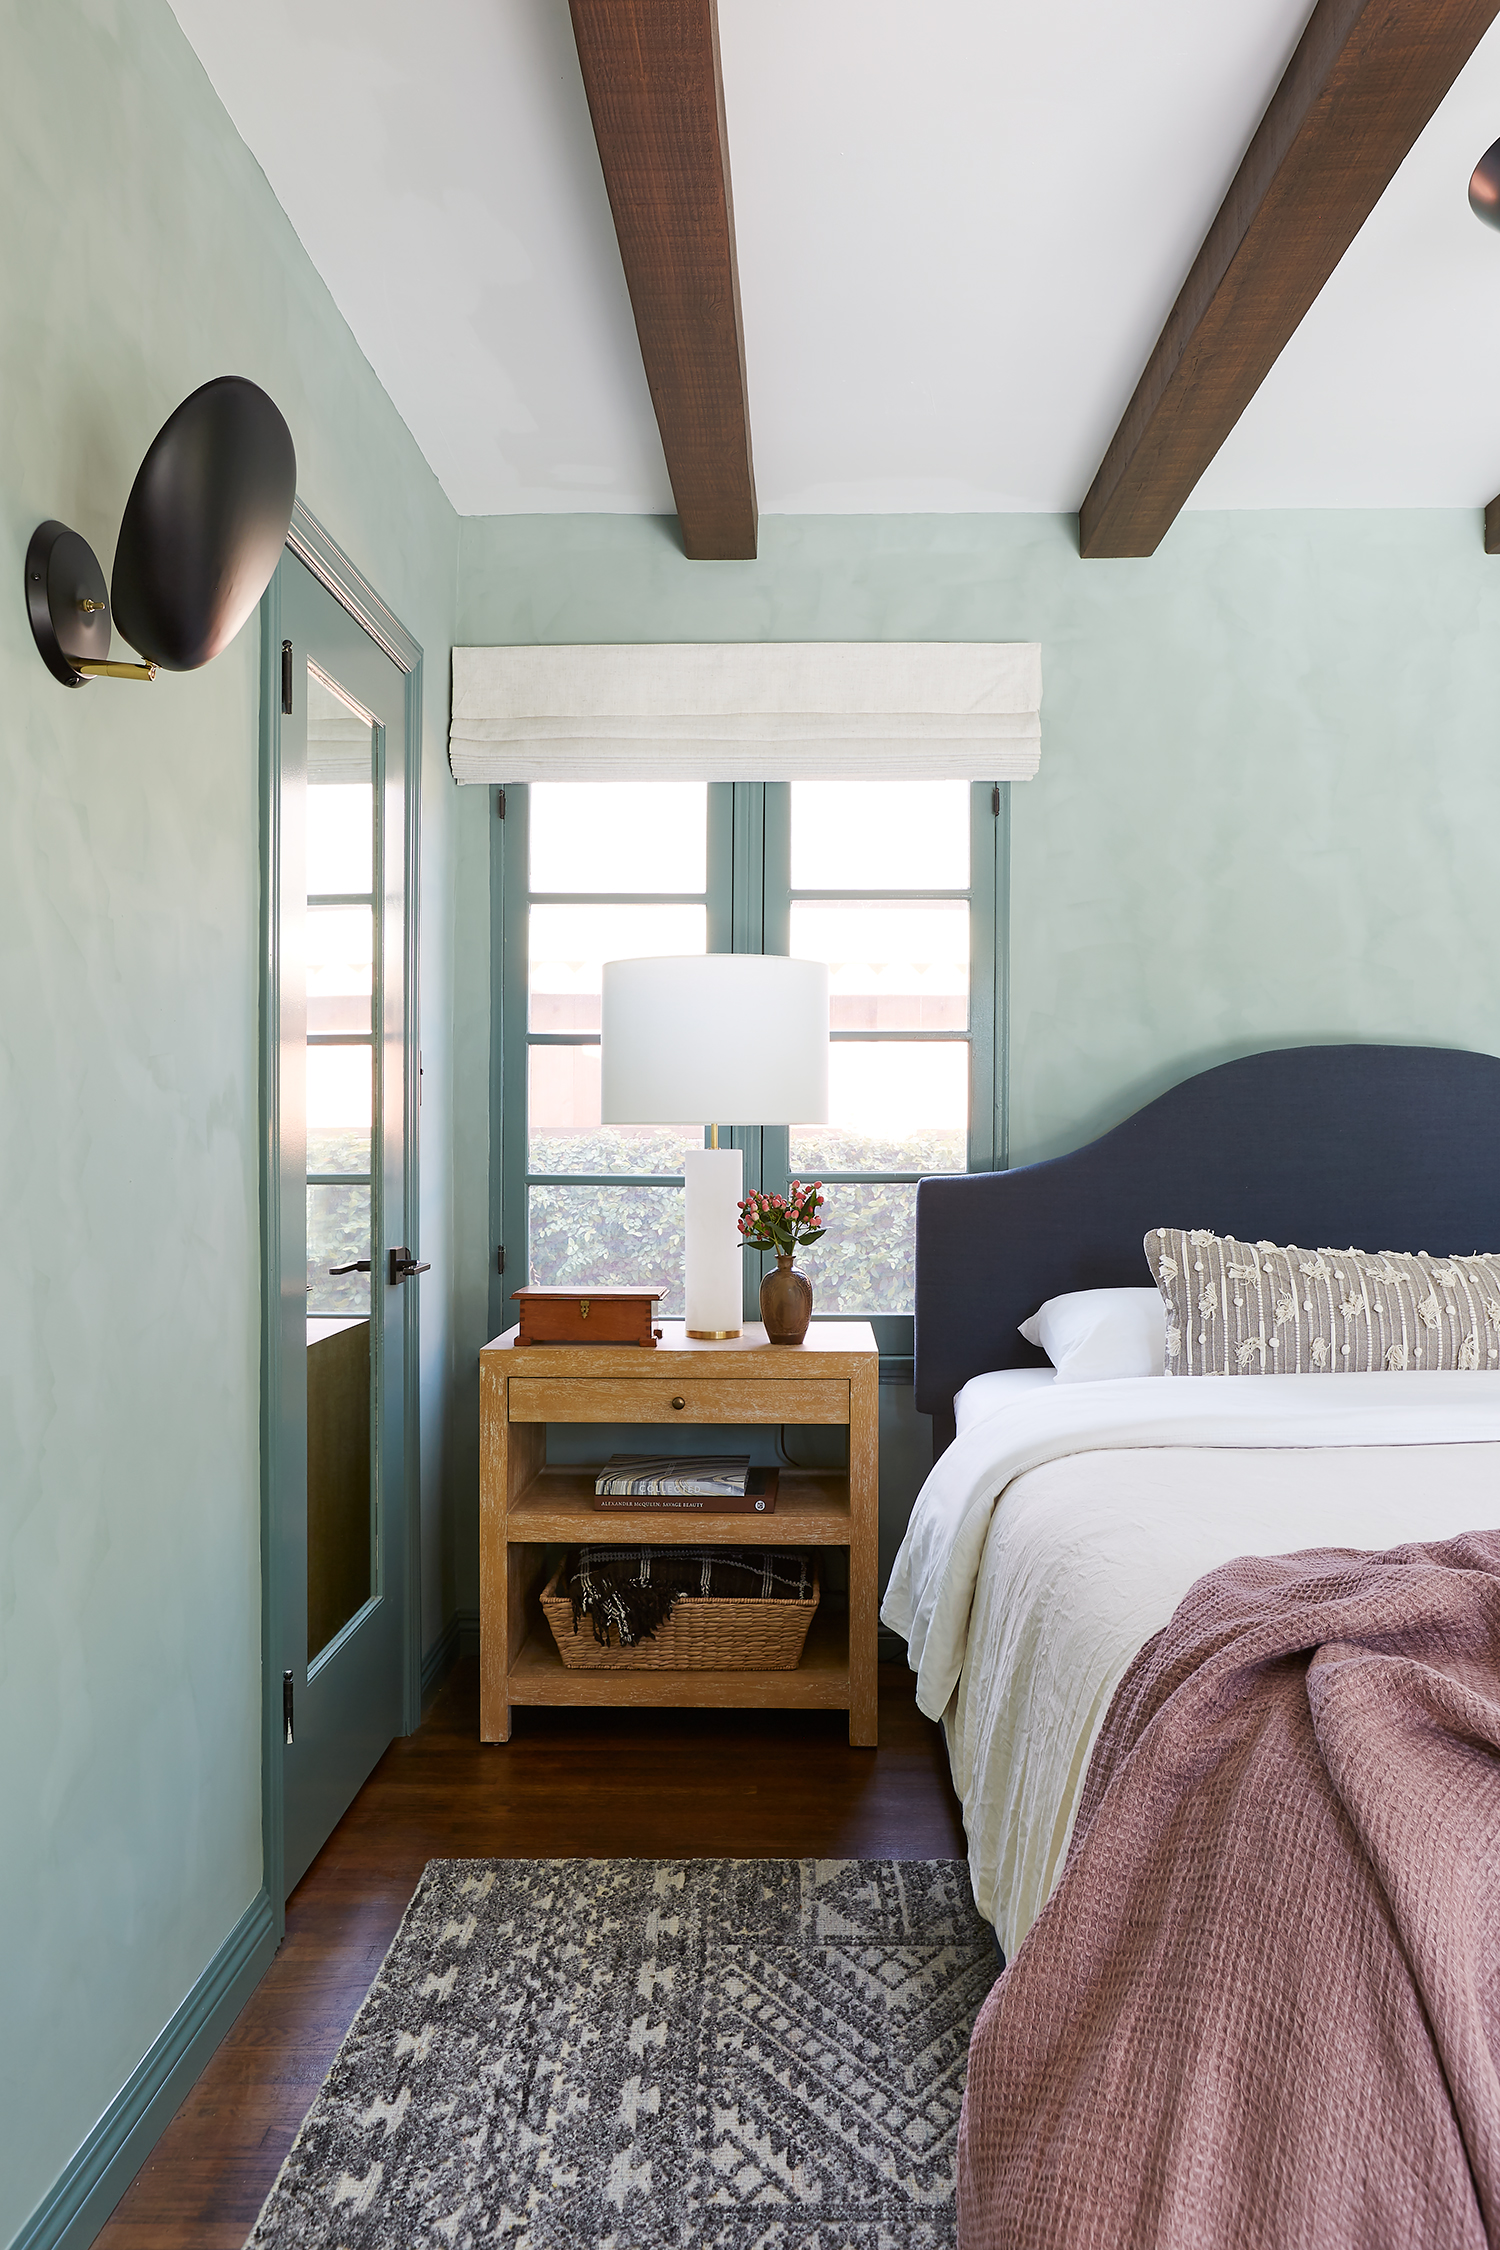
Of course, a comfortable bed was a central focus of the bedroom. The new bed frame and scallop headboard added visual interest and softened the hard lines of the room. I really like how the navy linen fabric helps anchor the bed on the wall. Pom Pom at Home helped me create a soft bedscape with their linen bolster, oversized throw blanket, and accent pillow. I’m normally on #teamtonsofpillows, but I’m officially a convert to #teamsinglepillow. It’s so easy to make the bed in the mornings, and I don’t have to find somewhere to store decorative pillows when we go to bed each night.
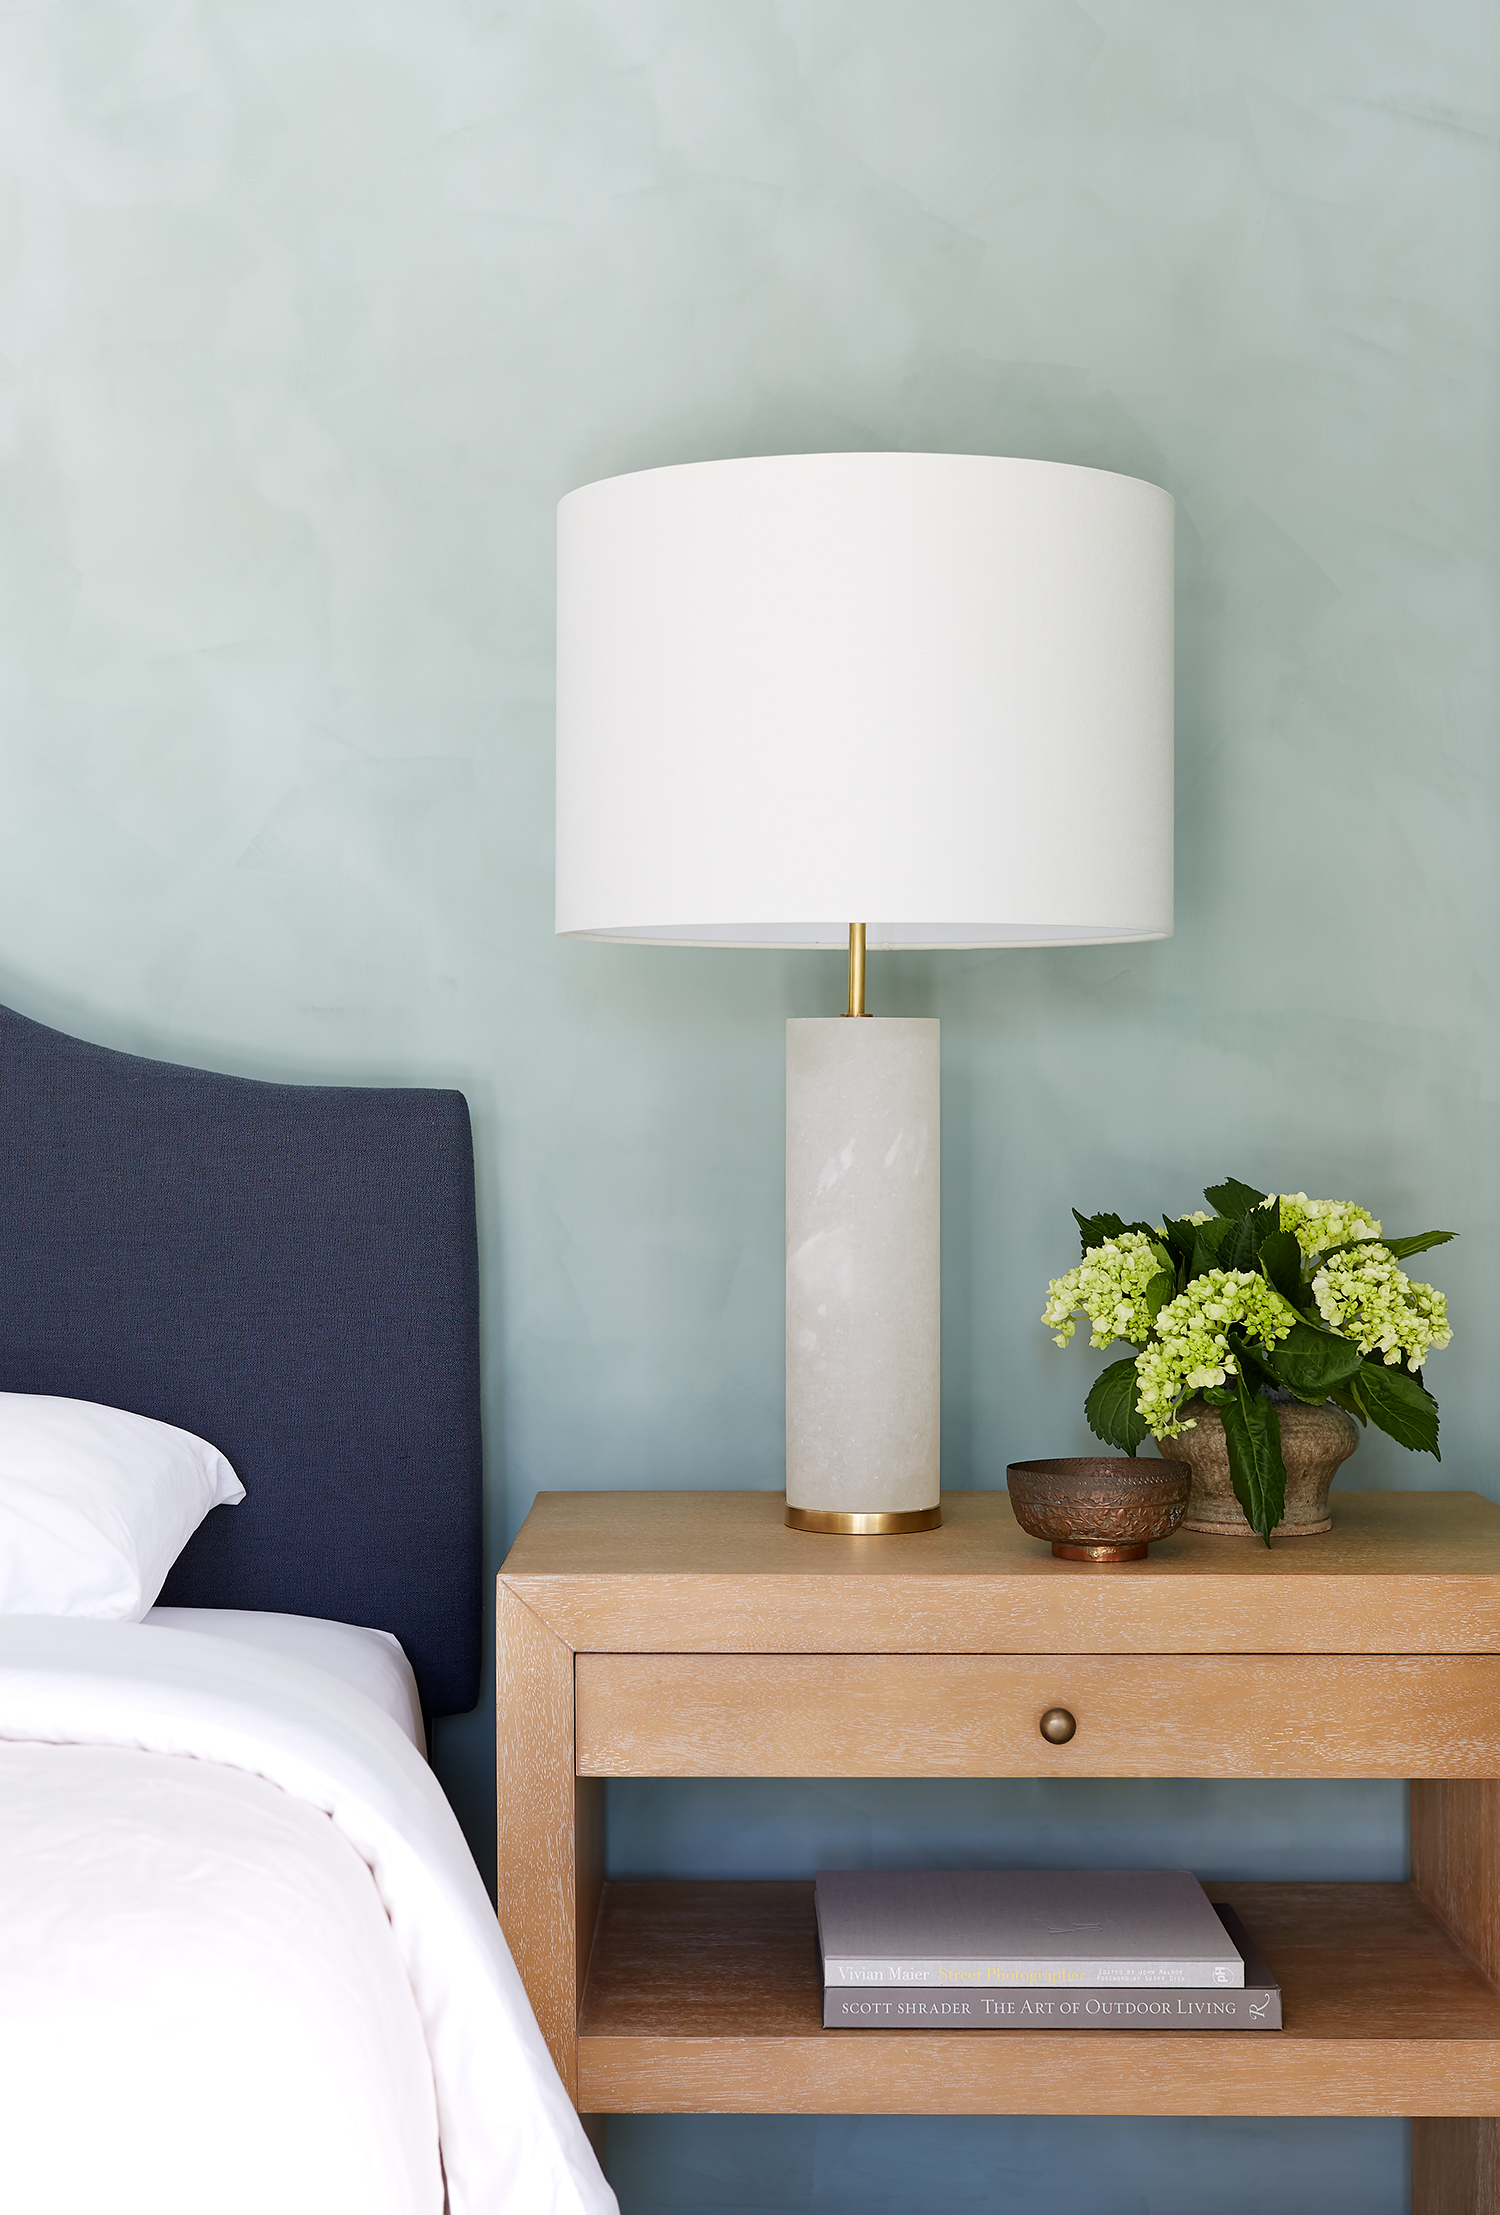
Shop The Nightstands

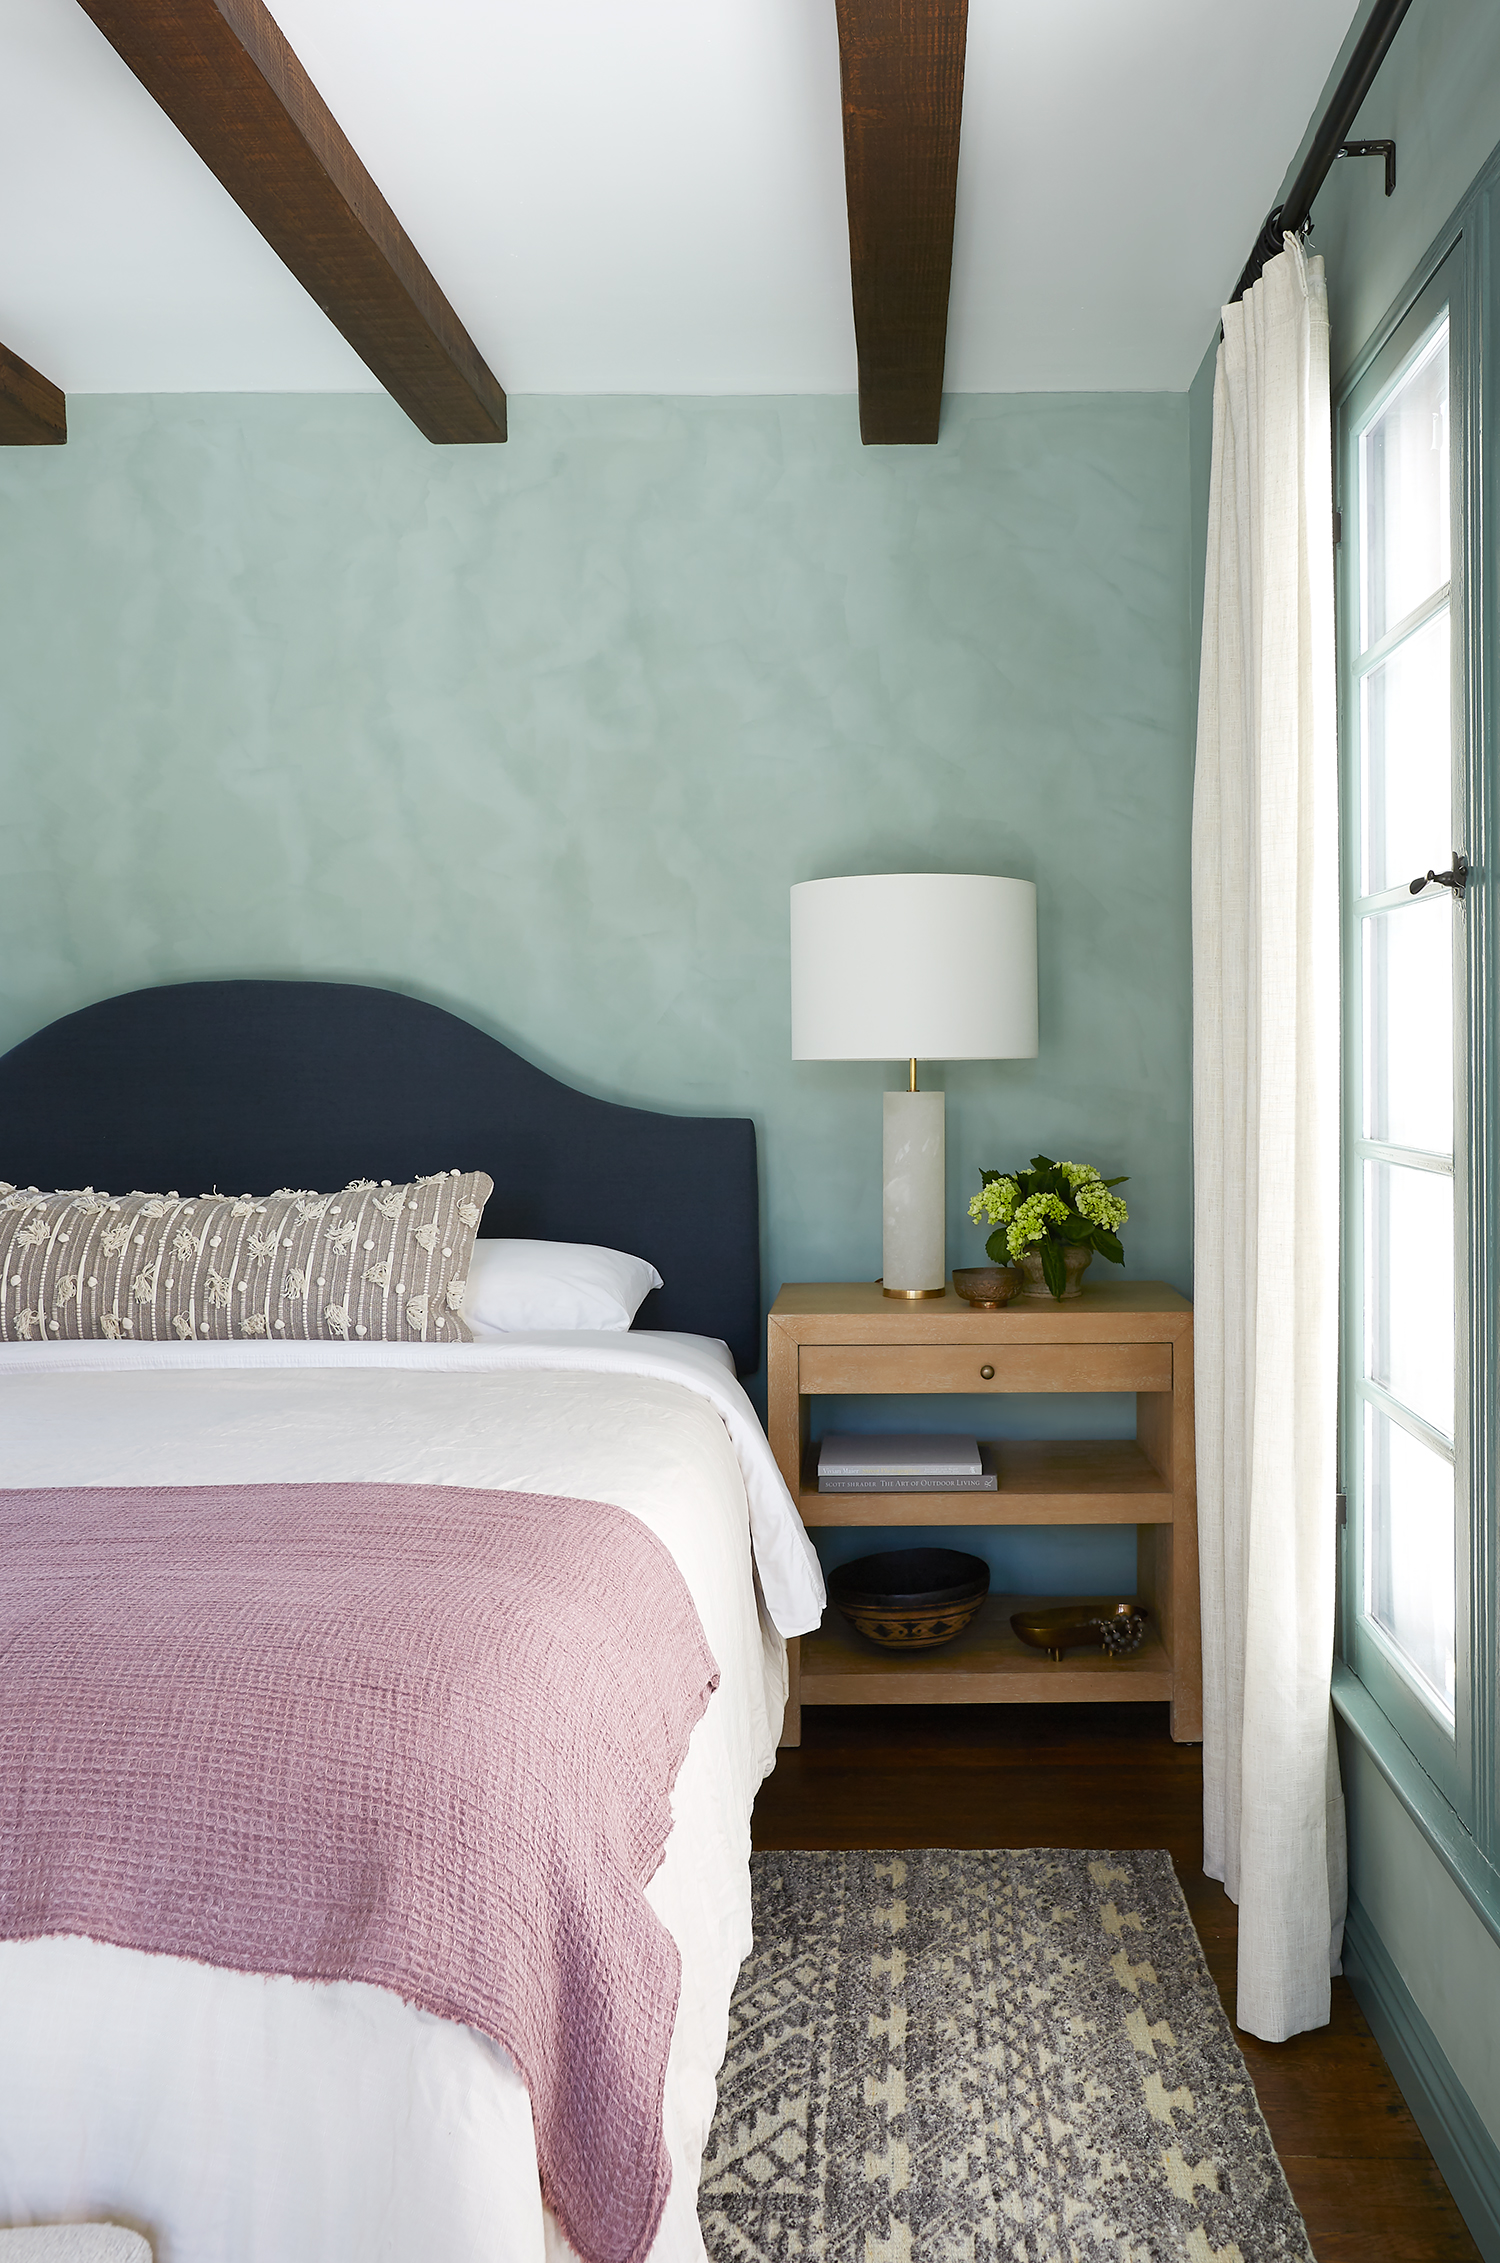
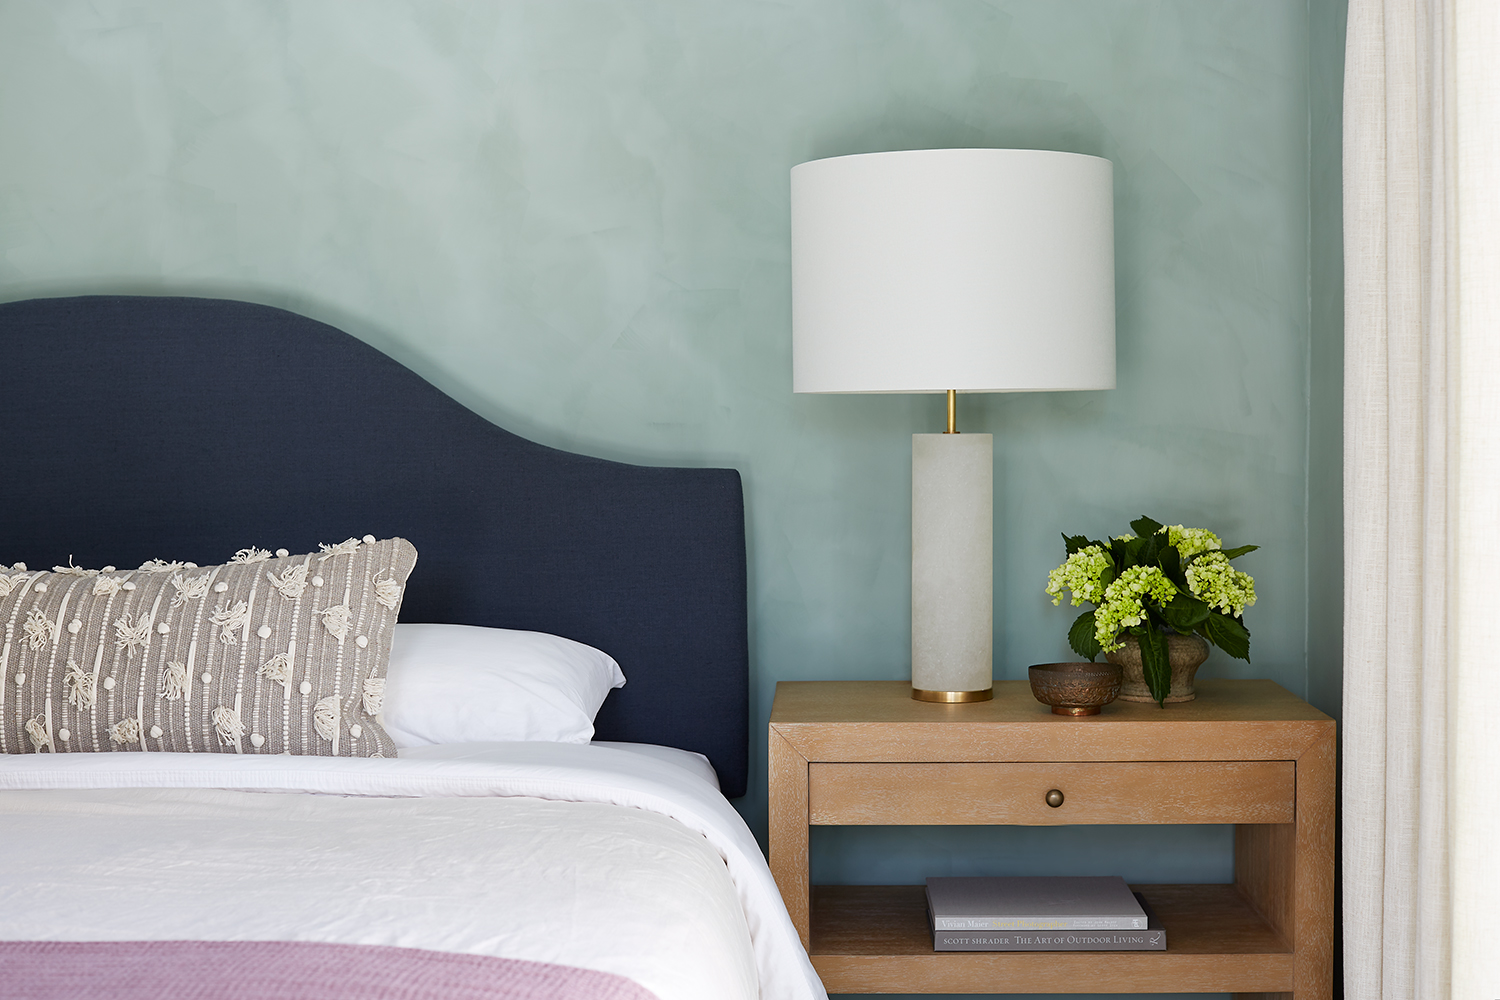
Before we started the project, our king size bed felt too big for the room, but now feels like the appropriate scale because we’ve balanced it with larger nightstands. I partnered with Wisteria on the open nightstands which have been the perfect balance of form and function. I love open storage to make things pretty, but I also had to have an open shelf for my husband to use his CPAP machine on his side of the bed (you won’t be seeing that in the photoshoot!). The cerused medium-toned wood brings a lightness that really contrasts the beams and looks great against the lime wash paint. I’m not normally much of a minimalist, but this room was just demanding for a pared back styling to let all the individual elements shine.
THE LIGHTING
Wall Sconce | Lamps | Chandelier
I took a lot of care to bring in statement-making lighting for this project. It’s the jewelry of the room, after all! The alabaster lamps on the nightstands feel substantial and luxe. I love how the light filters through the cracks and imperfections of the stone. We also added the black cobra wall sconce to help wash light on the new wall paint in the evenings, it’s a very romantic light and it’s relaxing on the eyes since the diffuser blocks the harshest light from the bulb. Finally, the gorgeous chandelier has made the room feel like a cozy haven for us when we’re getting ready for bed. The glow it casts on the ceiling is MAGICAL!
WINDOW TREATMENTS
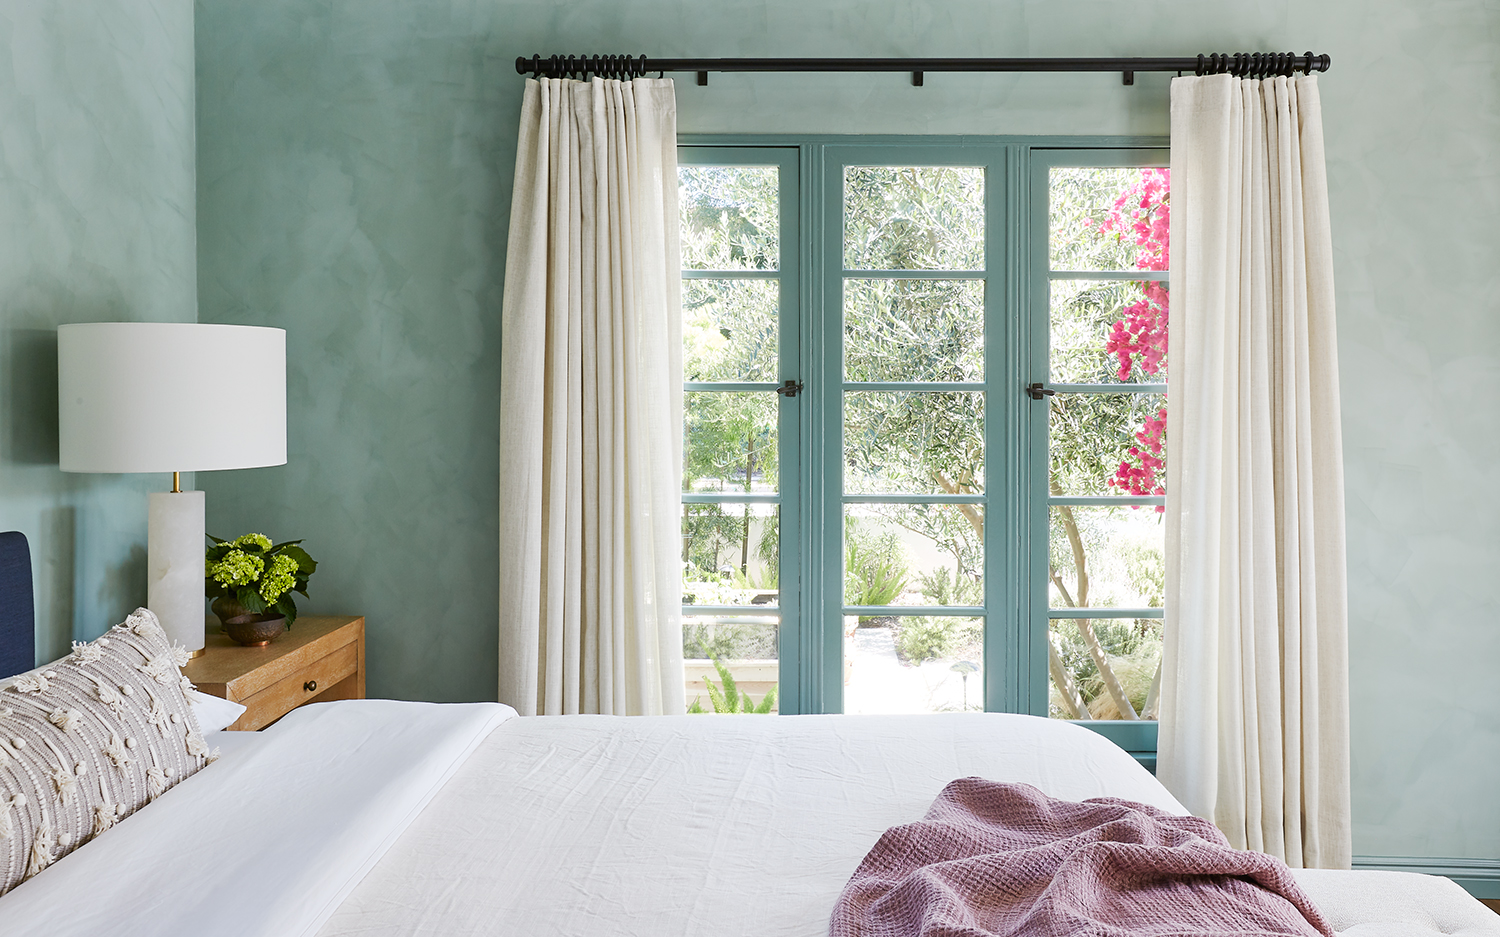
Off-White Linen Curtain Panels | Traverse Drapery Rod | Roman Shade
If you head back to the Week 7 blog post you’ll see all the work that went into the window treatments for this room. Turning curtains into draperies isn’t an easy task. By far, the easiest window to dress was the small window by the bed. I partnered with Select Blinds on this black-out roman shade since it was such an awkward spot in the room behind the bed. I needed something to block the light, but also be easier to open and close the draperies.
THE PAINT
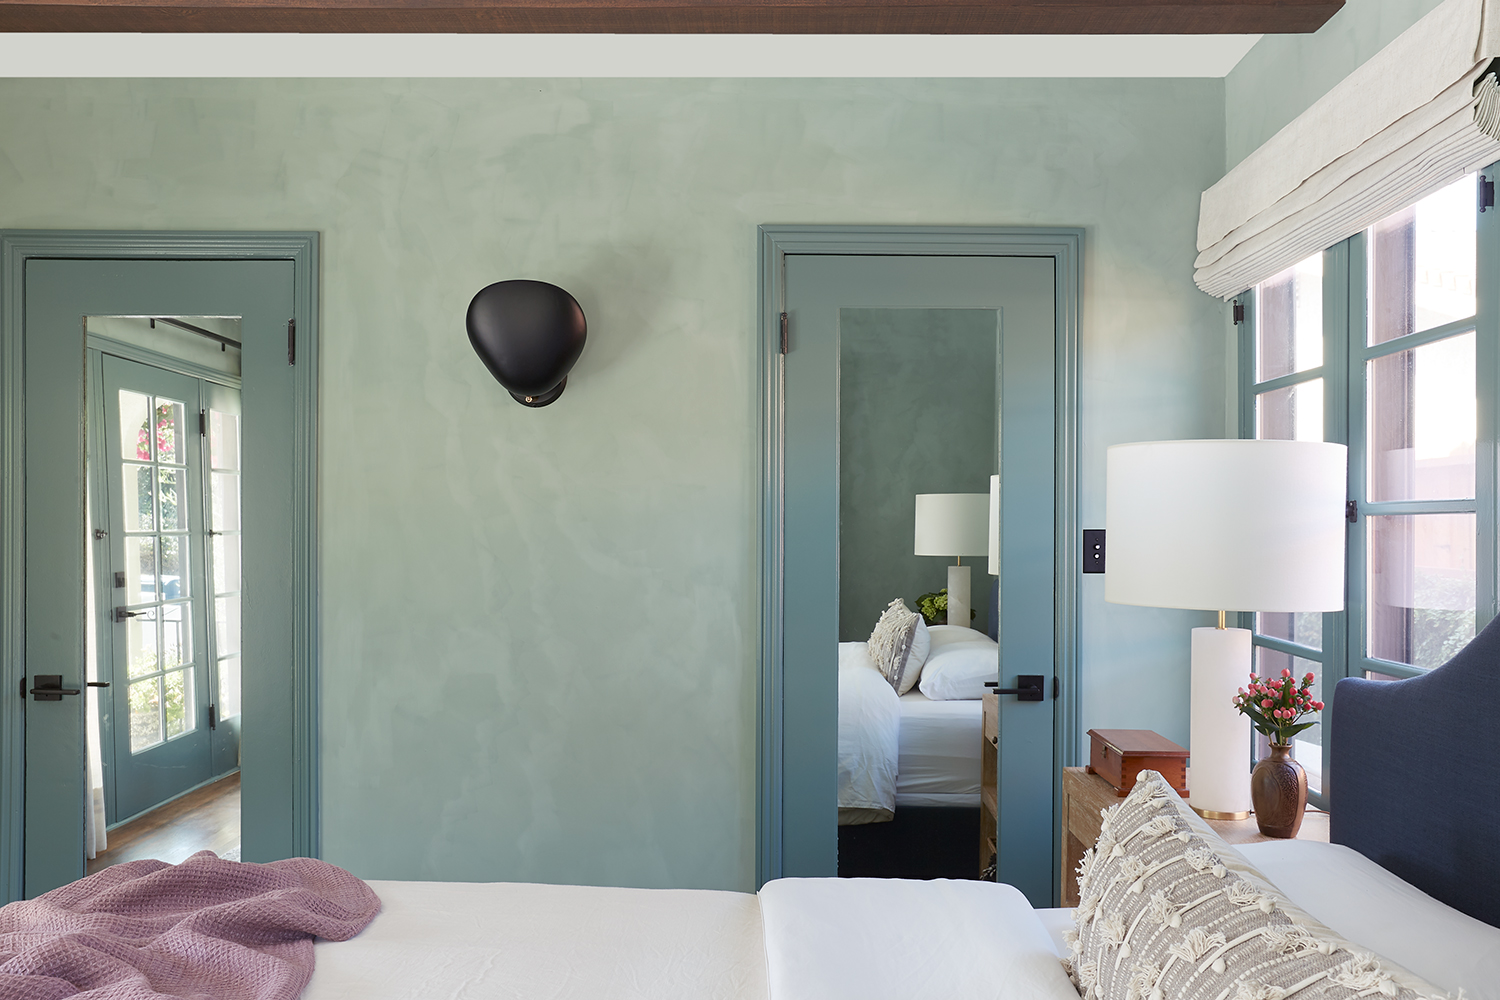
I know you’ve been drooling about the paint in the room. Back at the beginning of the challenge I used a paint sprayer for the first time to get this smooth finish on the windows and trim. I used Benjamin Moore’s Cedar Mountains because it coordinated with the limewash paint I had chosen for the room. For the limewash paint I worked with Portola Paints. The brushed texture and depth of color in the limewash was a perfect fit for our older home. It was also pretty forgiving to work with and it hides a lot of imperfections in our old plaster walls.
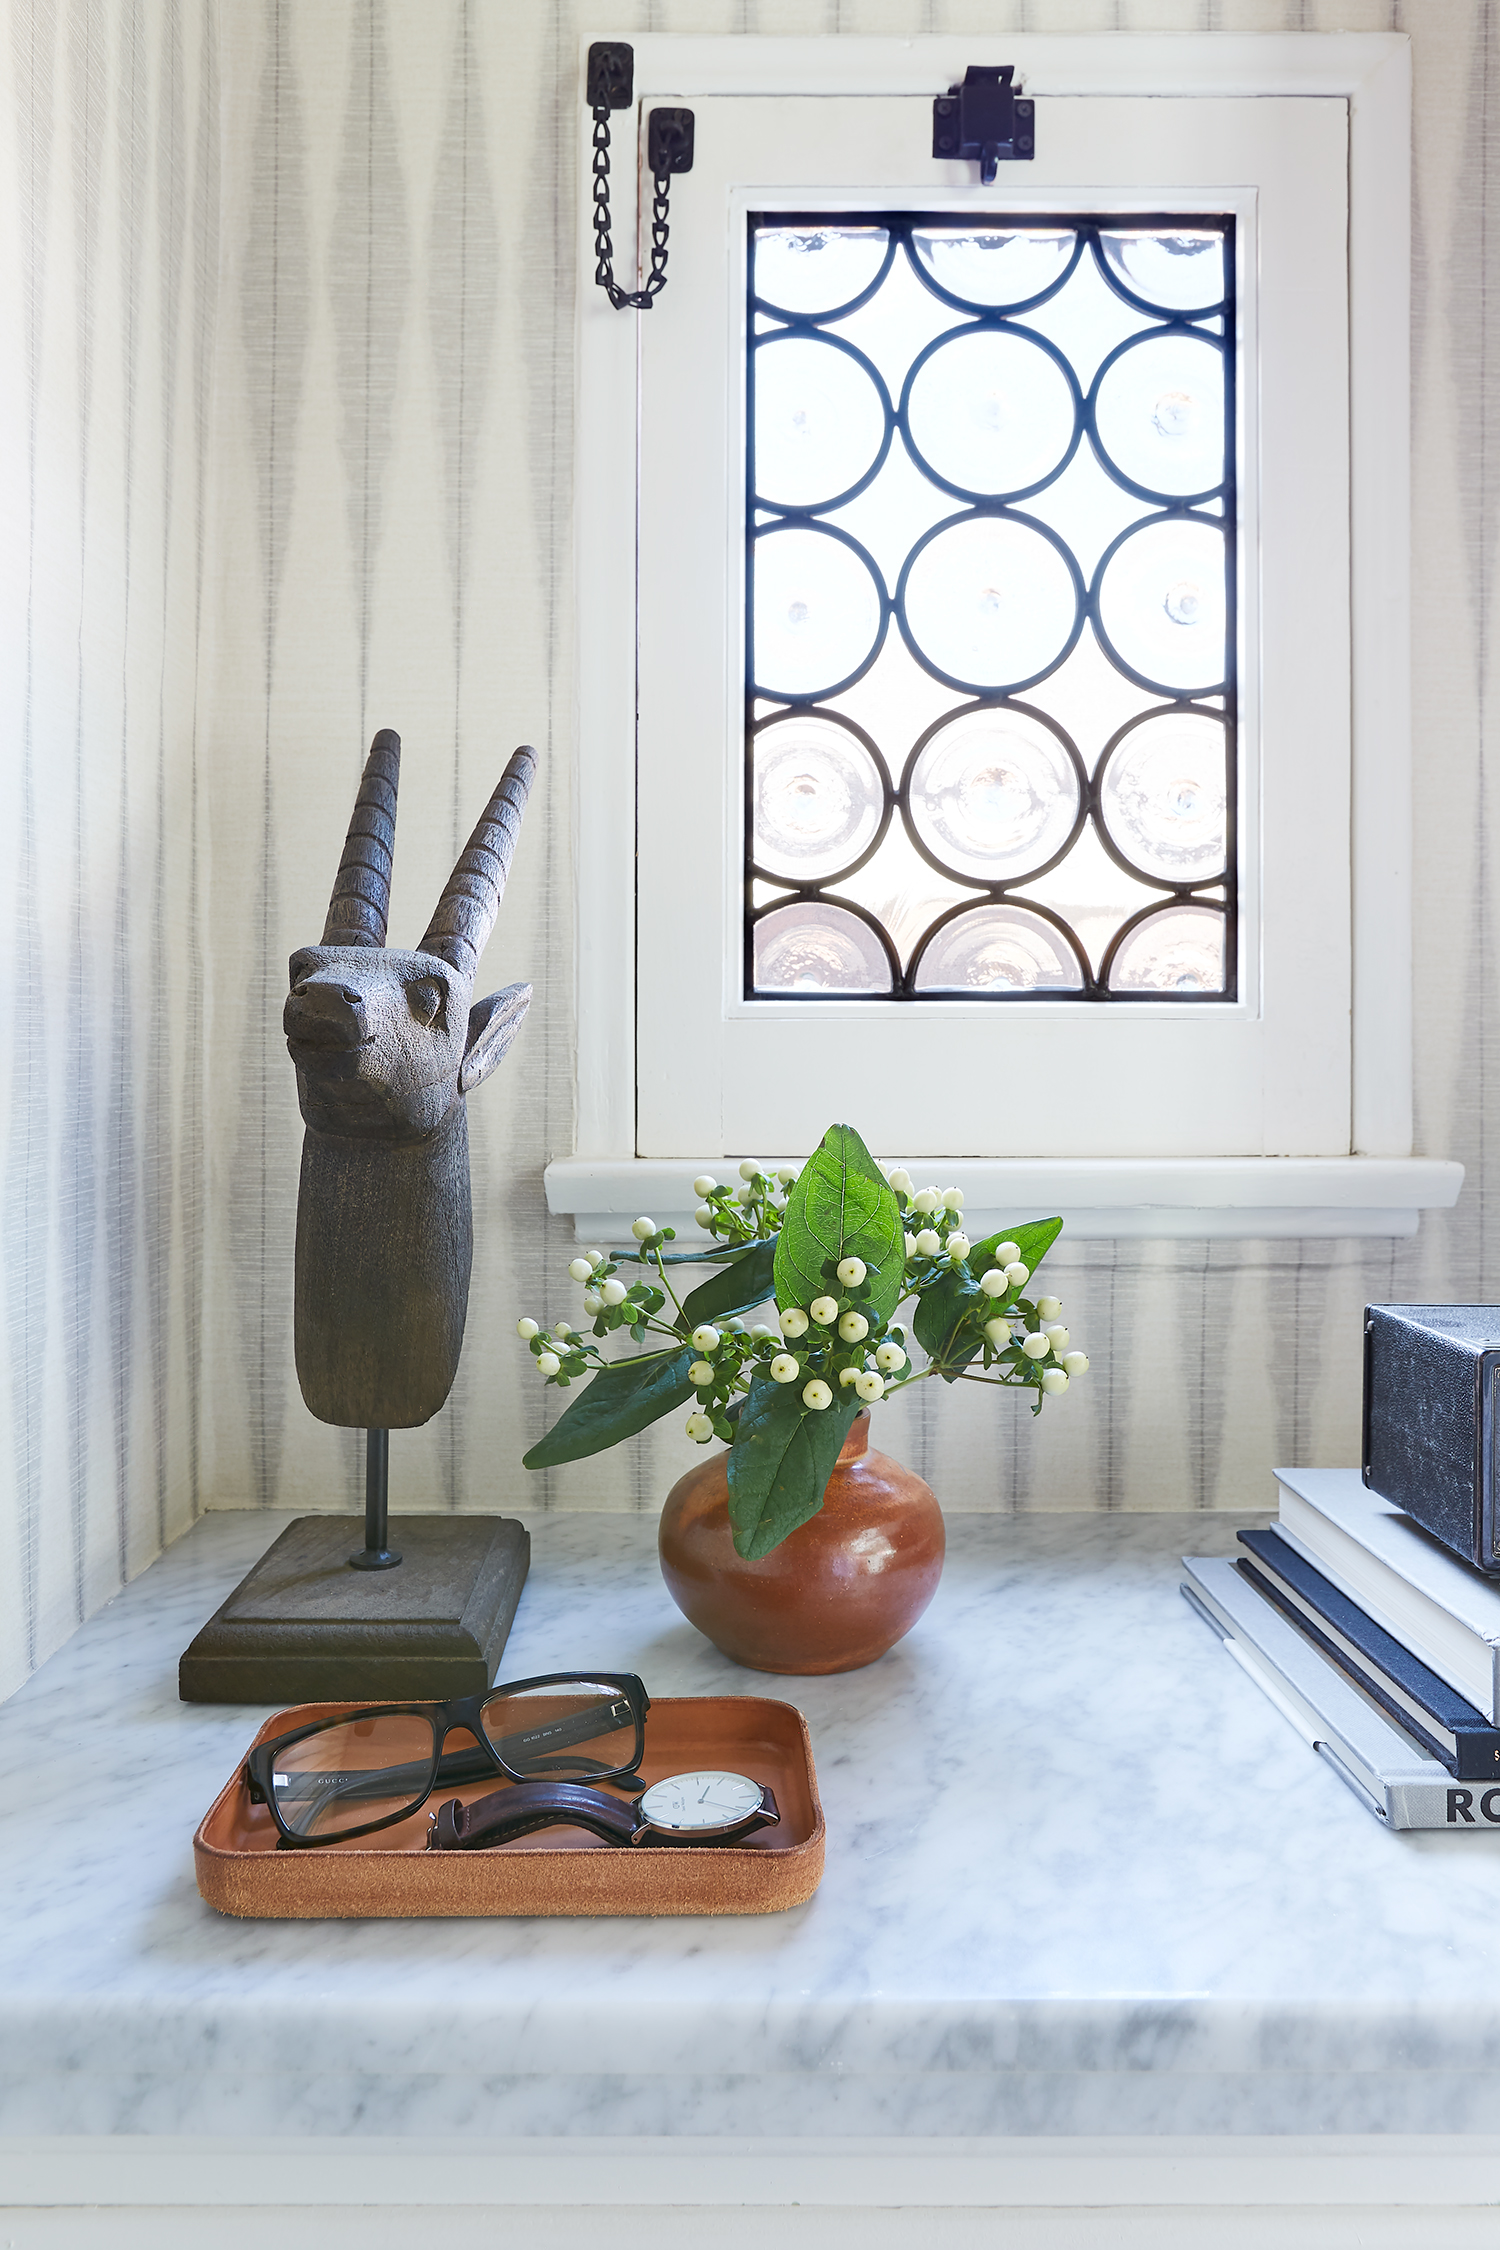
THE CLOSET
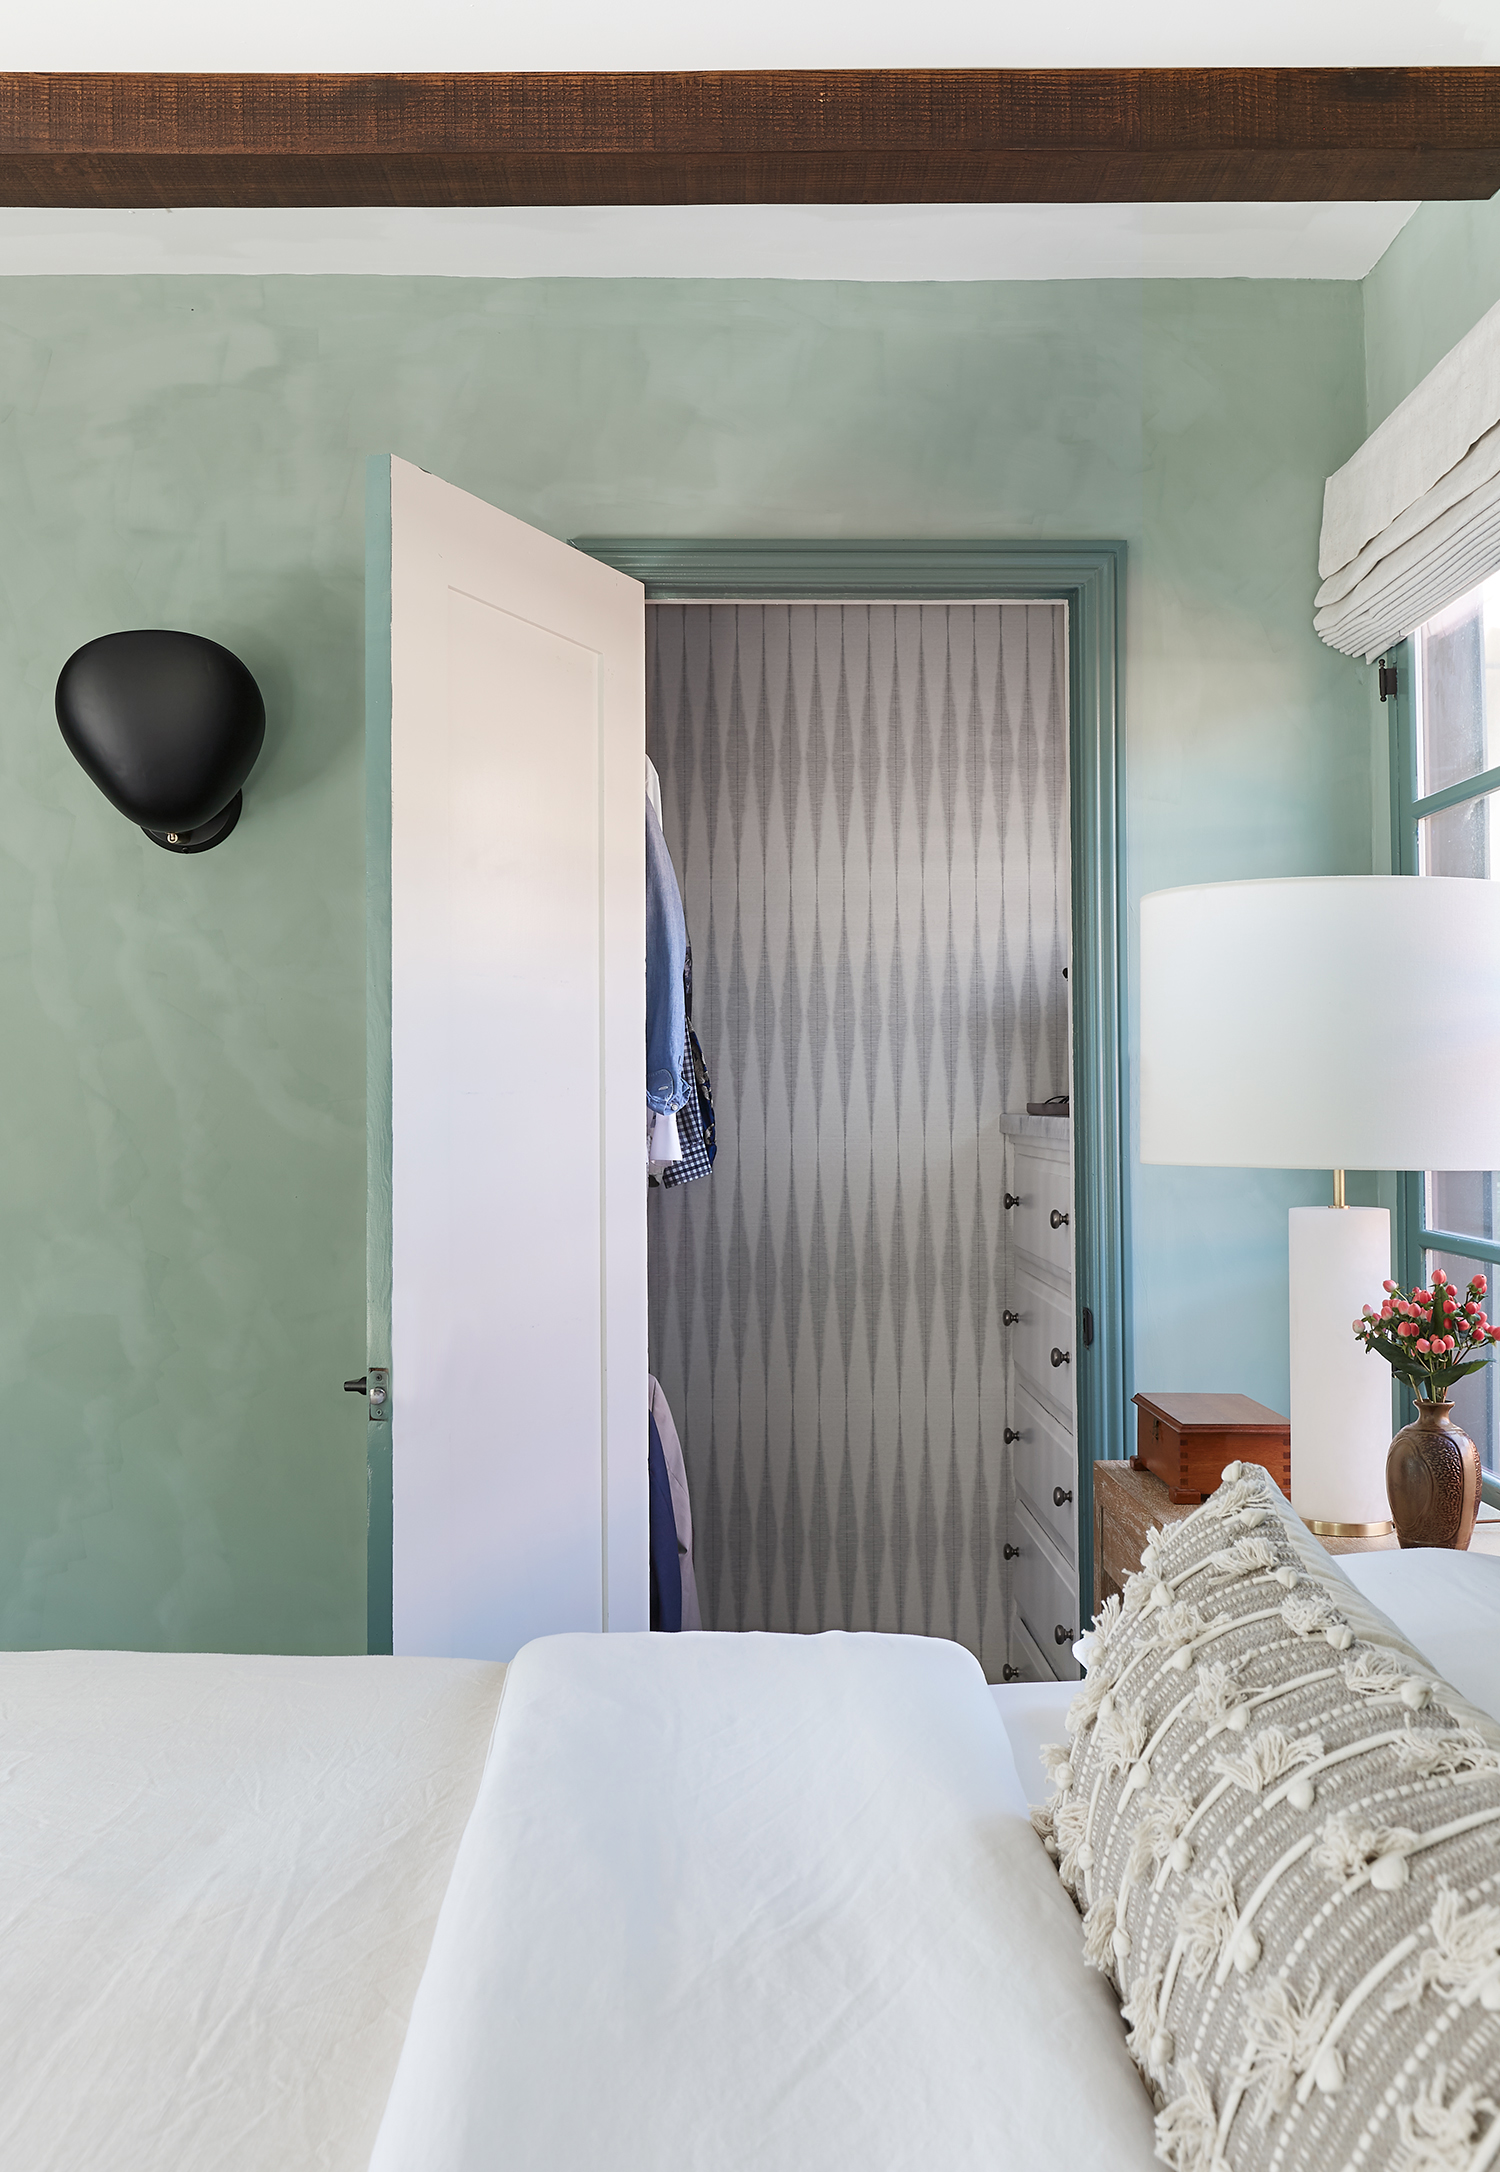
Finally, let’s head into the closet! Because it is quite honestly the most special room in the entire house now. This room has everything: a built-in dresser, a vintage crystal light, a custom leaded glass window, awesome hardware, extra closet storage, AND a marble counter top. I truly enjoyed collaborating with the glass artisan to create the custom leaded glass transom window panel, it’s one of the most unique parts of our home and it feels like it was originally here. I’ll wait while you catch your breath.
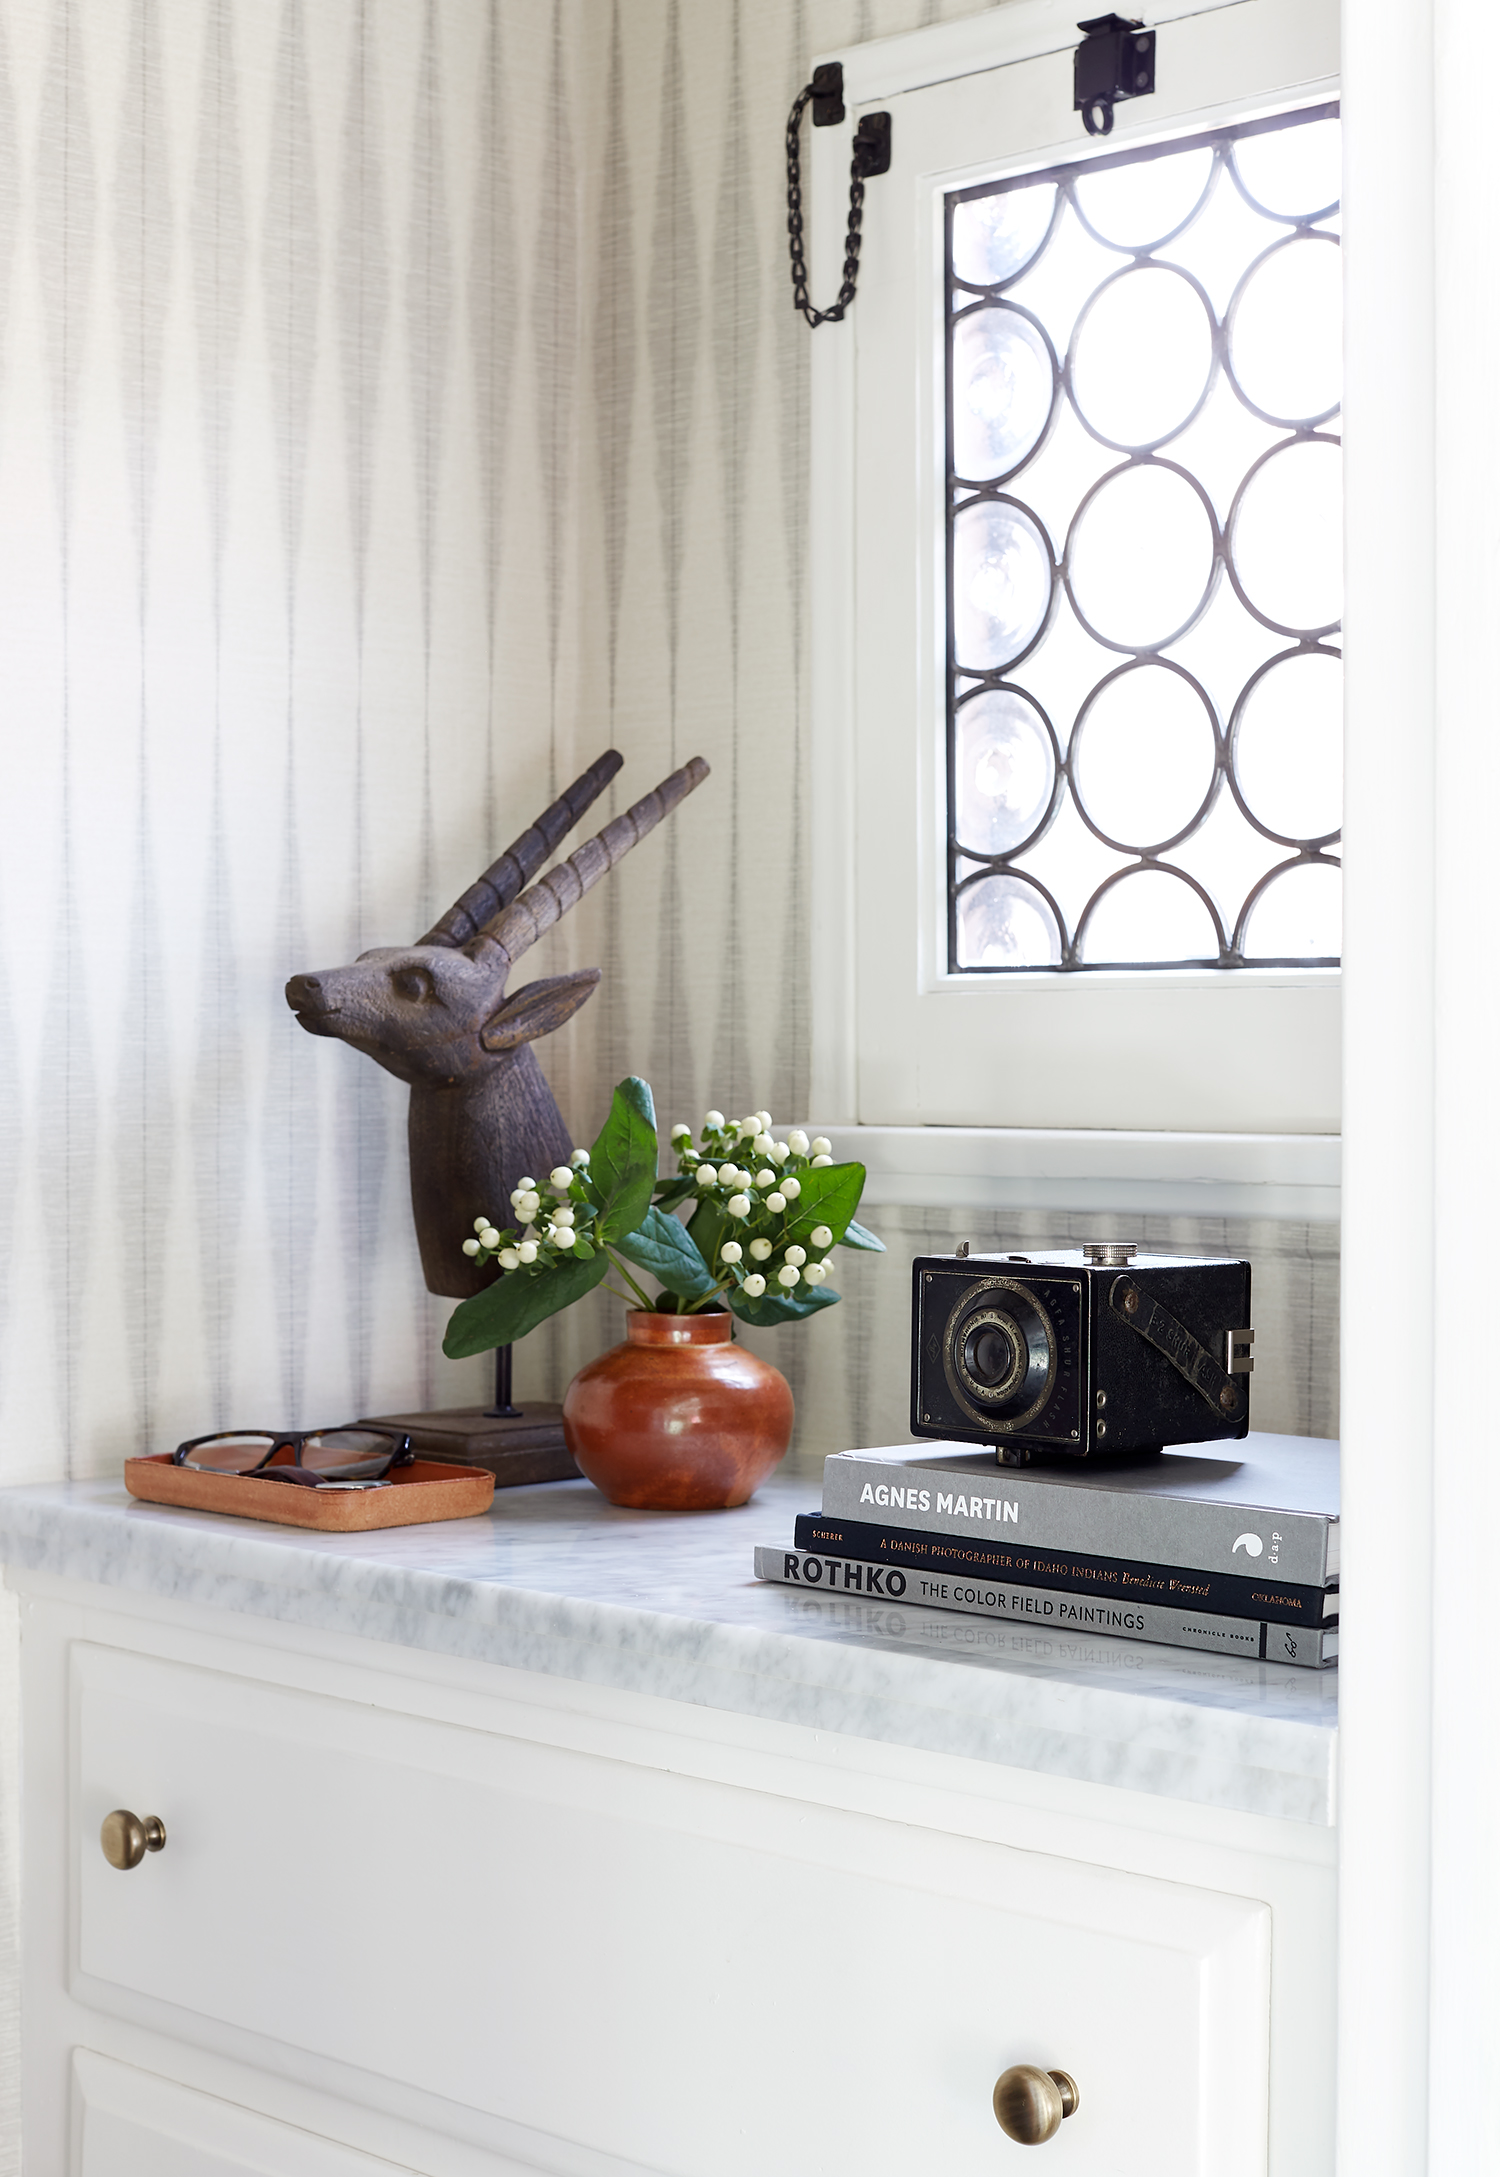
I’d like to introduce you guys to my friend GAZELLE BÜNDCHEN. I picked that wooden gazelle bust up a few years ago at a local vintage store without every really knowing where it would go. Ms. Bündchen patiently waited in my styling closet until the moment was right for her to work the runway. Now she’s living her best life in our closet. I never dreamed of having such a pretty closet in my entire life.
Shop The Closet
WHAT’S MISSING
Y’all I’m not gonna’ lie to you. Some things had to be sacrificed during this challenge. Some of you have been following the journey on Instagram since my Dad has some serious health concerns that need ongoing care. I lost some time bringing him to our house from his home in Arizona, then some more time when he was hospitalized and now recovering at my house again. He’s got a long road ahead of him and that meant I had less time for some of the finishing details of the room.
One of them was my vintage dresser, that I never got to decide whether to paint it or leave it the original wood. I also had some original artwork planned with custom framing, but it didn’t arrive before the photoshoot date because my framer was still working around #campcovid delays. Shipping delays from #campcovid also meant that I didn’t get my new brass picture rail in time to install it in the closet too. Did you notice any of these things? I’ll be honest, I’m not heart broken they didn’t make it into the shoot. I’d prefer more time to make deliberate decisions in the weeks ahead and I’ll keep you updated as I get to them.
THANK YOU
In the mean time, I want to thank you all for following along with this beautiful One Room Challenge journey with me. It’s been such a rewarding experience with so many new friends made along the way. If you haven’t already, take the time to explore the other participants and featured designers using the One Room Challenge link below. I couldn’t have made this room happen without my amazing sponsors. Their faith in my work helped make my ambitious dreams a realty.
MY WONDERFUL ONE ROOM CHALLENGE SPONSORS AND COLLABORATION PARTNERS:
Faux Wood Beams by Barron Designs | Rug by Jaipur Living | Pillows & Throws by Pom Pom At Home
Limewash Paint by Portola Paints | Roman Shade by Select Blinds | Nightstands by Wisteria
DISCLAIMER: Wrensted Interiors contains some contextual affiliate links. I only recommend products or services I use personally and feel my readers will enjoy. All opinions are 100% mine.